The “Prefabricated Construction Method for UPVC Drainage Pipes in Toilets” streamlines the installation process and enhances overall construction efficiency. During structural work, connection embedded parts and pipe hanger embedded parts for bathroom drainage branches are installed directly. Concrete is poured in one continuous operation, resulting in a flat, smooth, and clean structural surface that reduces the need for reserved holes. Additionally, the drainage pipes are uniformly sized, enabling on-site assembly without power tools, which minimizes dust and waste.
Mold Positioning
↓ Standard Pre-Embedded Parts Structure Installation

↓ Prefabricated Installation
↓ Detailed Construction Process Explanation Based on Engineering Examples ↓
Preparation of Embedded Parts Materials
The embedded components include UPVC floor drain parts, UPVC toilet connectors, UPVC riser pipe connectors, and hanging card base embedded parts.
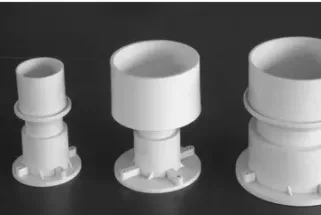
Pipeline connection embedded parts and standard hanging clamps
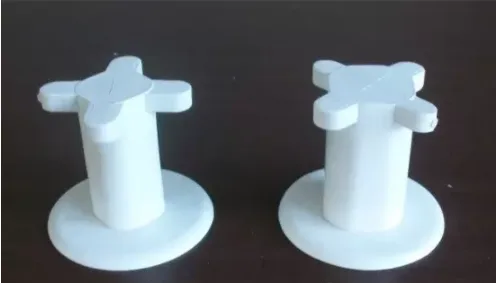
New type of suspension card embedded parts
Pre-embedded parts must be sealed prior to installation.
Construction Method
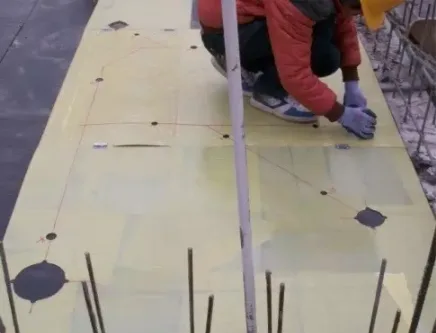
1. Create Pre-Embedded Positioning Templates
Using the reinforced concrete wall axis as a reference, develop a standard positioning diagram based on the spatial dimensions.
The positioning template is made from 0.8–1mm thick epoxy resin insulation board, chosen for its minimal thermal deformation and excellent rigidity. According to the layout, bathrooms are prepared with pre-embedded parts and standard positioning templates based on detailed blueprints.
The template consolidates the locations of all bathroom pre-embedded parts and includes hanger base positions needed for drainage branch pipe installation after design finalization.
For ease of handling, the template is designed to be foldable, lightweight, and convenient, with folding sections connected by hinges.
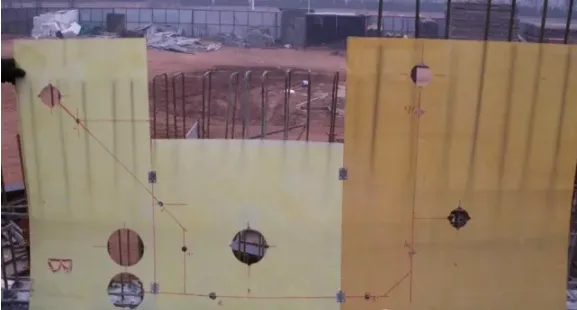
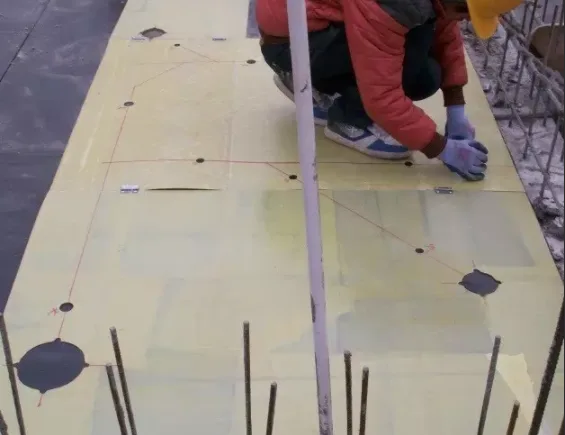
2. Position and Install Embedded Parts on the Plane
Use the positioning templates to accurately place pre-embedded parts, ensuring alignment with the structural axis.
BIM Design:
Mark each embedded part’s position and fixing points on the template with a white marker according to the template holes.
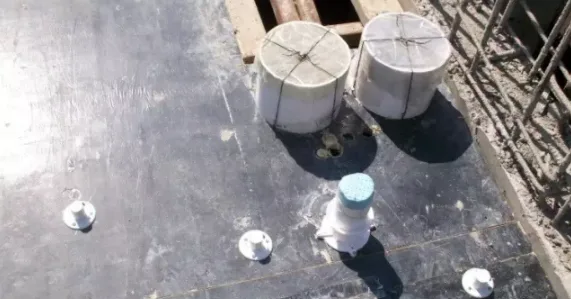
Before laying bottom reinforcement and after formwork erection, secure the embedded parts. Fix the embedded base holes firmly to the formwork using 20mm iron nails at marked points. Two types of pre-embedded bases are used for hangers: Φ20 for DE110 drainage pipes and Φ16 for DE50 pipes, suitable for socket and bonding installation.
Coordinate with the structural team to manage rebar binding and concrete pouring schedules. Assign supervisors to inspect the embedded parts for any damage or collision during these processes and replace parts immediately if damaged.
After removing the formwork and before pipe installation, cut off any nails protruding through the concrete slab, and apply anti-rust paint to prevent corrosion.

3. Measure, Cut, and Assemble Pipelines According to the Sample
Install sample layers and standard component samples following construction specifications and drainage pipe slope requirements, including vertical pipe installation. Do not apply PVC glue to sample layer joints until installation dimensions are confirmed.
Based on the layout of standard bathroom drainage pipes and fittings on the sample floor, measure and document branch pipe lengths, compiling a unified cutting and assembly dimension list.
Cut branch pipes according to the recorded measurements; maintain consistent lengths with a strict tolerance of +0/-5 mm.
Assemble and prefabricate suspension rods and branch pipes following the assembly number diagram. Use the template to segment and assemble branch pipes sensibly for convenient on-site installation and joint bonding.
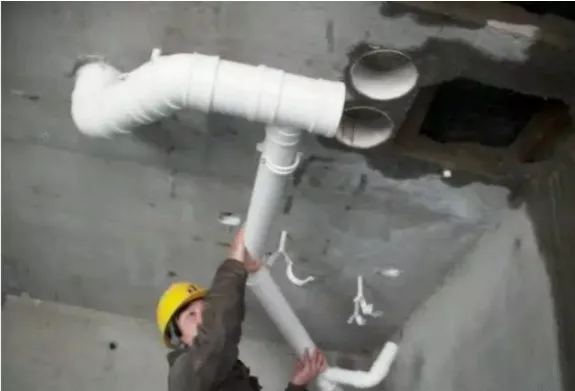
4. On-Site Assembly of Drainage Pipelines
Suspension Bracket Installation: After removing the top slab formwork, pre-embed suspension brackets into base holes. Install brackets uniformly according to the standard template, adjusting suspension rod lengths as necessary. Clean embedded pipeline parts during hanger installation. Because drainage pipes require specific slopes, suspension rods vary in length and must be numbered and installed accordingly.
Branch Pipe Assembly: Use PVC glue to bond segmented branch pipes, then insert them into corresponding embedded parts, ensuring a tight fit between connected pipes.
Assembly should proceed from larger to smaller pipes, and from the riser’s proximal end to the drainage system’s distal end. Secure each pipe section with hanging clamps during installation.
As structural work advances, branch pipe assembly and installation occur simultaneously after formwork removal and cleaning. Once secondary structures (partition walls and ventilation ducts) are completed, install drainage risers—including ventilation risers—from top to bottom, sealing reserved holes for the risers.

Comparative Analysis: Engineering Examples vs. Traditional Construction Methods
1. Installation Using Pre-Embedded Components for Connections
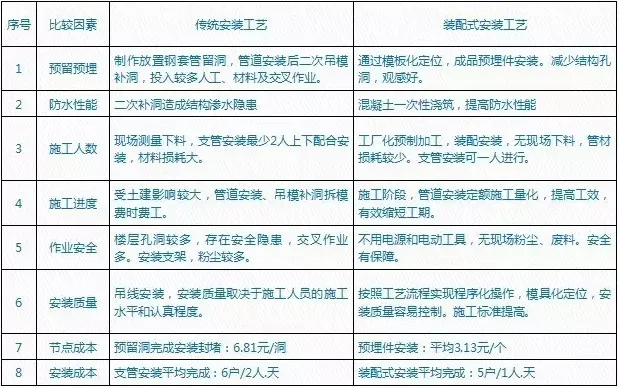
2. Direct Embedding of Hanging Card Embedded Parts
The new elevator component costs 0.30 yuan each. In traditional methods, installing a suspension base requires one M6 expansion bolt (0.20 yuan) and the base installation costs 0.40 yuan, saving 0.30 yuan per hanger in materials.
Labor cost calculations show that a skilled worker (earning 180 yuan/day) can install 300 expansion bolts per day using an electric hammer, translating to 0.60 yuan per hanger. Overall, the new process reduces direct costs by 0.90 yuan per hanger.
In a project with 544 bathrooms averaging 7 hangers each, installing just one hanger using the new method saves approximately 3,400 yuan. Previously, two workers completed six rooms daily; now one worker can install hangers in five rooms per day, significantly increasing efficiency.
Direct cost savings also come from reducing material shortages and waste, as the new method eliminates on-site waste and debris.
Technological improvements have dramatically shortened installation times, accelerated UPVC pipe installation, reduced dust from hammering, and minimized damage to pre-embedded electrical conduits. The UPVC drainage pipe installation now requires no power tools, produces a clean finished appearance, and greatly enhances installation quality.


Must log in before commenting!
Sign Up