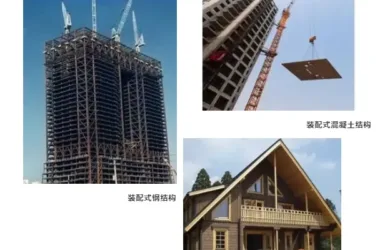
2019… Prefabricated Construction Revisited
Prefabricated construction and BIM (Building Information Modeling) technology are currently trending topics in the construction industry. They share many similarities and complement each other effectively. BIM technology offers innovative solutions to accelerate the development of prefabricated construction in four key areas, significantly enhancing efficiency and quality throughout the lifecycle of prefabricated building components—from production and installation to cost management and maintenance.
Construction Simulation
BIM-based construction simulation can be categorized into 4D and 5D simulations. Before performing 4D simulations, the project structure must be decomposed and coded, similar to traditional construction planning. This step lays the foundation for schedule management. Typically, this decomposition is visualized through a project structure diagram, which breaks down the project into layers via a tree diagram, covering all subprojects.
The primary form of 5D construction simulation is “animation walkthrough,” which virtually displays the actual project through immersive animation. This technique enhances the owner’s understanding of the construction project, clarifies design intent, and serves as a powerful tool for construction planning. Additionally, animation walkthroughs help construction teams familiarize themselves with the project, improve technical communication, facilitate smooth collaboration, and provide a robust foundation for optimizing construction management.
Output of Drawings
Using BIM models, flat drawings can be generated directly. To meet construction drawing standards, further 2D detailing can be applied. Various design details are automatically added by extracting parameter data from the BIM model, which greatly improves drawing production efficiency.
Smart Construction Site Management
The smart construction site solution centers on an IoT cloud platform, which integrates multiple onsite subsystems to collect, store, analyze, and apply data from various site conditions. By combining these modules flexibly based on actual management needs, the platform enables comprehensive perception, collaborative workflows, intelligent analysis, risk prevention, knowledge sharing, and seamless interconnection throughout the construction process. This modular, intelligent, and networked approach addresses fine management requirements of construction companies, supports scientific decision-making, and elevates supervision standards across enterprises.
BIM Integrated with the Internet of Things (IoT)
IoT-enabled information management assigns each precast concrete (PC) component a unique wireless RF chip embedded within it. This chip records all production steps and related information, enabling single-item tracking. Acting like an “ID card” for each component, it provides full traceability of the production process and facilitates fast, seamless integration of information with physical logistics.
Beyond overall project planning and management with prefabrication and BIM technologies, attention must also be paid to the actual construction of prefabricated projects.
Waterproofing Considerations
1. Outer drainage cavity with adhesive and inner cast-in-place concrete self-waterproofing
Prefabricated exterior wall panels that combine internal casting and external hanging (known as PCF panels) primarily use outer drainage cavities and adhesives for waterproofing, while relying on cast-in-place concrete self-waterproofing on the inner side of the joints.
This joint waterproofing method is the most common for exterior wall panels. Its advantage lies in relatively simple and fast construction. However, it poses challenges in controlling waterproof quality, with frequent cavity blockages. Cracks in the inner concrete can lead directly to waterproofing failure.
2. Closed-line waterproofing for external prefabricated exterior wall panels
For spaces or buildings with stringent waterproofing requirements, polyurethane waterproofing is applied inside rubber waterstops to reinforce reliability. Drainage pipes are installed approximately every three layers on the waterproof silicone of exterior walls to effectively channel rainwater seeping into the decompression space outward.
The closed-line waterproof structure combines internal and external waterproofing, as well as thinning and blocking techniques, providing comprehensive waterproof protection. However, this method demands high construction precision: wall panel displacement must not exceed 5mm, or the rubber strips will not seal properly. The weather-resistant waterproof adhesive used must exhibit high elasticity, aging resistance, and a service life of at least 20 years. Additionally, the cost is relatively high, and the adhesive application must be performed by skilled and experienced teams.
3. Open-line waterproofing
The outermost waterproofing approach uses pre-embedded rubber strips, which simplify quality control and inspection. During installation, there is no need to apply glue externally on the wall panels, eliminating scaffolding or suspended platform requirements, thus improving safety and convenience. However, this method requires stringent product protection—damaged pre-embedded rubber strips are difficult to replace. The cost of weather-resistant rubber waterstops is also high. Open-line waterproofing represents the most advanced external wall joint treatment but is patented by foreign companies. Due to patent fees, its adoption remains rare in China.
4. Seam waterproofing
1) Precise measurement and layout before installation are vital.
Set not only the baseline but also positioning lines for wall panels to assist with accurate placement during lifting. Wall panel adjustments usually involve two stages: coarse and fine. Coarse adjustment involves placing and unhooking panels according to control lines, while fine adjustment ensures axis alignment and vertical deviation remain within allowable tolerances, typically not exceeding 5mm.
2) Strict adherence to process flow during application.
The external wall panel joints must be glued following design specifications. The base layer and reserved cavities should be cleaned with high-pressure air. Before glue application, backing depth must be checked carefully, and glue thickness must meet design standards. The wall panels at glue sites should be primed to enhance adhesion between glue and concrete. If glue application is interrupted, construction joints must be left with the inner joint higher than the outer, overlapping by at least 5cm.
Inner wall panel joints and cross joints are sealed with polyurethane. Since iron parts lack rubber waterstops, rust prevention must be thorough before polyurethane application. The seal must be tight and gap-free. After construction, a water splash test is required to ensure no leakage before sealing with cover plates.
3) Waterproof performance testing after completion.
Once waterproofing is finished, a water spraying test should be conducted promptly. Focus areas include wall panel cross joints, connections between prefabricated panels and cast-in-place structures, and window frames. A fire hose is recommended to spray the test areas. External inspections should check for delamination in glued areas, proper drainage, and internal watermarks. If leaks are detected, an additional polyurethane waterproof layer can be applied inside the panels to enhance protection.
Common Quality Issues and Preventative Measures
1. Exterior wall panels lacking 600mm upturn and water stop groove, causing leaks
Prevention:
- Remove insulation boards reversed at the bottom of upper and top of lower prefabricated wall panels as per node drawings to create a fire isolation zone and facilitate waterproofing.
- Before installing upper panels, clean the wall base thoroughly. After grouting, install panels, calibrate, and temporarily fix. Spray water into grouting holes before grouting to ensure material flow and compactness.
- Apply two coats of JS cement-based waterproof coating within 200mm above and below horizontal joints.
- Conduct spray tests as done for exterior aluminum windows. If no leakage, proceed with external insulation.
2. Poor bolt design, omissions onsite, and improper substitution with expansion bolts causing conduit disconnection and cost increases
Prevention:
- Design team provides embedded bolt positioning diagrams based on 3D models, including diagonal support lengths and angles. Check for clashes with conduits or wire boxes and update drawings promptly.
- Quality inspectors verify bolt positions, fixation, exposure length, and protection onsite. Report conflicts to project leaders or designers immediately for adjustments.
3. Using only four lifting points for laminated panels; improper stacking and support causing cracking
Prevention:
- Design department marks lifting point locations and quantities on component drawings according to the center of gravity.
- Manufacturers mark lifting points clearly on panels.
- Molding strength must meet design requirements with proper curing.
- Technicians conduct pre-molding technical disclosure, ensuring lifting points match design and that slings are properly tensioned and adjustable.
- Stacking sites must be flat, following specifications, with aligned blocks and stacking height limited to six layers.
- Horizontal components should be lifted slowly up, quickly across, and slowly placed down.
- When installing, temporary supports must be within 0.5m of horizontal supports and spaced no more than 2m apart. For panels spanning 4m or more, add mid-span supports limiting camber to 0.3% of span.
4. Random stacking of prefabricated components with misaligned wooden blocks leading to cracks
Prevention:
- Ensure flat stacking sites. Adjust cushion blocks to align bottom blocks on the same plane for even load distribution.
- Limit laminated panel stacking to 6–7 layers for prefabricated buildings, with a maximum of 10 layers.
- Never omit cushion blocks between boards; vertical blocks must align in a straight line and meet specification standards.
5. Wall panel lifting deviation
Prevention: Correct panel positioning, strengthen onsite construction management, and enhance supervision and inspection.
6. Damage caused by lifting collisions
Prevention: Recheck wall verticality, adjust fixing bolts to stabilize panels, reconstruct dense mortar areas for compactness, and enforce regulated lifting operations to avoid rough handling.
7. Missing fixed points for embedded bolts on prefabricated component diagonal supports
Prevention:
- Construction teams must mark all fixed points based on drawings. Before concrete pouring, inspect quantity and quality of reserved reinforcement, ensuring none are missing or misplaced.
- Supervisory and project teams should strengthen acceptance inspections for this aspect.
8. Insufficient grouting of prefabricated components
Prevention:
- Before hoisting, check grouting pipes and joints for blockages. Moisten pipes with a small amount of water 30 minutes before grouting, avoiding accumulation.
- Use pressure grouting machines to fill component holes continuously, compacting and smoothing surfaces before final setting.
- Use the grouting material within 40 minutes of mixing.
9. Lack of reserved tension bars in prefabricated components
Prevention: Strengthen inspection of cast-in-place nodes. Supervisory bodies and owners should re-inspect. Design teams must add tension bars where needed and ensure timely rectification. For produced but uninstalled components, plant wall reinforcement; for installed ones, reinforce joints later.
10. Steel bar deviation in prefabricated components
Prevention: Use steel reinforcement positioning frames and support bars according to component number to ensure accurate placement. After concrete pouring, verify reinforcing bars’ center positions against layout plans. Correct deviations over 10mm as per drawings.
11. Excessive sealing mortar application
Prevention:
- Re-implement blocking measures and submit handling plans for approval before execution.
- Strengthen onsite management to prevent excessive sealing mortar affecting grouting quality.
- Improve NPC technical specifications with clear regulations on sealing mortar thickness, volume ratio, and related standards to support inspection and acceptance.


Must log in before commenting!
Sign Up