In China’s current prefabricated building projects, sleeve grouting connection shear wall structures represent a significant portion. With the national standards for prefabricated buildings and assembly rates steadily improving, sleeve grouting connection technology is becoming increasingly vital. Two main installation methods are commonly used for sleeve shear walls: the seat grouting method and the connected cavity grouting method. Due to market misconceptions and information dissemination, the connected cavity method is often preferred on construction sites. However, the seat grouting method offers notable advantages in terms of process efficiency, quality, scheduling, and cost. Below, we analyze these aspects in detail.
1. The Seat Grouting Method Features a Simpler Process
The connected cavity grouting method follows this workflow: measurement and setting out → steel bar straightening → base cleaning → watering and wetting → setting elevation control gasket → wall panel installation → setting diagonal support → horizontal position adjustment → verticality adjustment → sealing → curing → grouting.
In contrast, the seat grouting method proceeds as follows: measurement and setting out → steel bar straightening → base cleaning → watering and wetting → setting elevation control gaskets → laying grouting material → installation of positioning brackets → wall panel installation → setting diagonal supports → verticality adjustment → grouting.
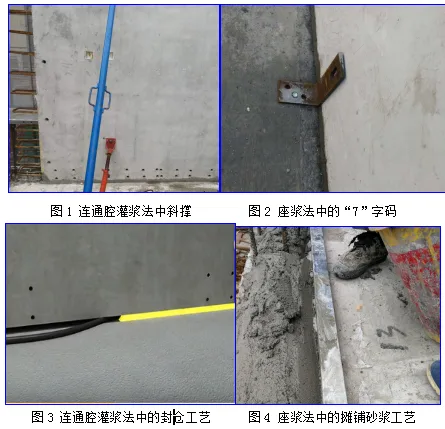
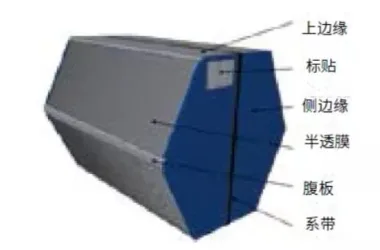
Key differences arise in several steps. First, the horizontal positioning of the wall panel: the connected cavity method relies primarily on adjusting the downward inclined supports, which often requires repeated fine-tuning. The seat grouting method uses guiding angle codes, allowing direct positioning and eliminating the need for continuous adjustments. Second, the filling of the wall panel’s bottom joint varies: the connected cavity method demands pre-sealing the bottom’s surrounding area with grout, a process that requires strict control over depth and strength, making it complex and prone to grout leakage if not sealed properly. Conversely, the seat grouting method involves laying the bottom with seat grout before panel installation, shaping it with a spatula into a middle-high, two-sides-low profile that ensures full contact. This approach is straightforward, intuitive, and easy to control.
Overall, the seat grouting method significantly simplifies the process and reduces operational difficulty compared to the connected cavity grouting method.
2. The Seat Grouting Method Offers Superior Quality Assurance
The connected cavity method involves injecting grout from a single hole to fill other sleeves via the bottom cavity. However, in practice, this approach often leads to quality defects caused by grout fluidity loss, trapped air within cavities, and bubbles at contact surfaces. Specific issues include:
Loss of Grout Fluidity
Since the cavity remains sealed and dry, grout material contacts dry concrete surfaces continuously during injection, resulting in significant water loss and reduced fluidity. This compromises grout strength and density, posing safety risks.
Air Entrapment and Localized Cavities
Uneven grout flow or failure to expel air at the cavity ends can leave the bottom of the wall panel inadequately filled. This weakens structural stress resistance and risks water leakage.
Bubbles Forming an Isolation Layer
Experiments reveal that mixing grout creates many bubbles, which rise to the bottom contact surface, forming a bubble layer that reduces compressive strength and creates an air gap between the wall panel and grout. This air layer connects interior and exterior spaces, posing a significant water leakage hazard. Additionally, national regulations require a rough surface with grooves at least 6mm deep at the wall panel bottom. These grooves often remain partially unfilled, exacerbating the impact of bubbles.
Quality Risks During Grouting
The connected cavity method carries many uncontrollable risks during grouting: 1) Pressure grouting risks causing leaks if the sealing material fails, and quick repair is difficult, potentially compromising joint fullness and quality. 2) Grouting occurs indoors with a short timeframe, making it hard to detect leaks on the outdoor side immediately. Late detection leads to costly rework or severe quality issues. 3) Rapid grouting may cause some sleeves to fail releasing grout. Stopping inspection mid-process can cause grout to flow undesirably, requiring complete re-grouting if delays exceed 30 minutes, which is costly and undermines quality.
In contrast, the seat grouting method excels in quality control: 1) Each joint is filled individually by bottom seat grouting during panel installation, ensuring compactness and structural performance. 2) Grouting sleeves one by one guarantees thorough filling and reduces external interference. 3) Independent sleeve grouting allows problematic sleeves to be addressed separately without disrupting the entire process.
3. The Seat Grouting Method Saves Construction Time
In the connected cavity method, before bottom grouting, the wall panel relies entirely on elevation adjustment gaskets for support. Delays in grouting after installation impact upper structure construction. The sequential tasks of panel installation, bottom joint sealing, grouting, and upper structure work extend the timeline, especially considering a one-day gap between sealing and grouting.
Conversely, the seat grouting method allows the bottom joints to be filled immediately after panel installation. The seat grout reaches a strength of 15MPa within one day, sufficient to bear the upper structure load. Sleeve grouting can proceed simultaneously with upper structure construction, significantly reducing overall construction time compared to the connected cavity method.
4. The Seat Grouting Method Reduces Costs
The connected cavity method requires filling the bottom cavity entirely with high-strength grout, which is a premium dry powder slurry costing about 35% more than the base slurry used in the seat grouting method. Thus, the seat grouting method offers notable cost savings.
In summary, compared to the connected cavity grouting method, the seat grouting method delivers clear advantages in process simplicity, quality assurance, construction speed, and cost efficiency. However, two common misconceptions prevail:
1) The seat grouting process takes longer than the connected cavity method.
2) The seat grouting method tends to create gaps at the bottom during elevation and verticality adjustments.
These misunderstandings arise from a limited perspective among technical management personnel in prefabricated construction.
Regarding the first misconception, while the seat grouting step itself is slower due to one-by-one grouting, when factoring in the manual and technical downtime required for sealing in the connected cavity method, the seat grouting method actually requires less overall time. Additionally, using an improved manual grouting machine can greatly enhance the efficiency of individual sleeve grouting, reinforcing the seat grouting method’s time advantage.
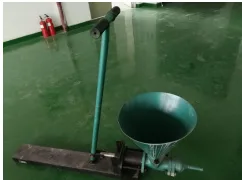
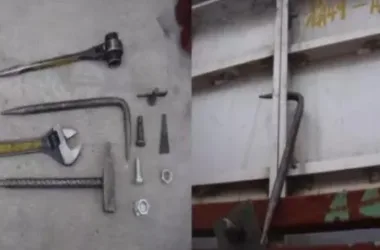
Figure 7 Manual grouting machine
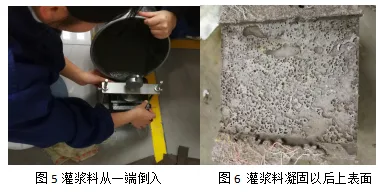
Regarding the second concern about elevation and position adjustment, two practical solutions can be implemented: 1) Before panel installation, fix a “7”-shaped code along the panel edge, allowing the panel to slide down smoothly during installation and ensuring one-step placement. 2) Seal the outer wall side with angle steel and fix wooden beams along the inner edge of the wall panel. This setup not only facilitates positioning but also ensures full mortar compaction at the joint.
By addressing these challenges, the seat grouting method’s benefits become even clearer. As professionals in prefabricated construction, it is crucial not to be misled by superficial appearances but to understand the core technical realities. For structural safety, the seat grouting method should be the preferred approach for connecting sleeve shear walls.
Author: Wu Ping


Must log in before commenting!
Sign Up