1. Construction Preparation
(1) Working Conditions
1. The main structural components in the plastering area have been jointly inspected and approved by relevant parties (including construction, design, supervision, and construction units). Door and window frames, as well as embedded pipelines, have been installed and passed inspection.
2. Scaffolding for plastering should be erected first, maintaining a 200-250mm gap from the wall. Scaffold boards must be installed to prevent dust from falling and causing waste. Any fallen debris should be collected and reused.
3. Remove protruding parts (such as explosive molds) from concrete wall surfaces. Chisel out honeycombs, rough patches, exposed reinforcement, and loose parts down to the solid substrate. Fill these areas in layers using 1:2.5 cement mortar, removing exposed steel bar heads and wire leads. Smooth concrete surfaces must be cleaned and treated by chiseling or spraying, followed by curing for 2-3 days to promote strong bonding between mortar and concrete.
4. For walls with different interfaces, reinforcement must be applied according to design to prevent plaster surface cracks. This project requires a 0.8mm thick, 9×25 hole iron mesh to be installed on both sides of concrete and masonry joints, extending 150mm on each side. Stairwell and pedestrian passage infill walls should be reinforced with steel wire mesh under the mortar layer.
5. Brick walls should be thoroughly watered one day before plastering. Aerated concrete block walls, which absorb water slowly, require watering two days in advance, ideally twice or more per day.
6. Scaffold holes and abandoned openings should be sealed before plastering. Clean debris inside the holes and moisten before sealing. Exterior walls should be sealed tightly using fine stone concrete.
(2) Material Requirements
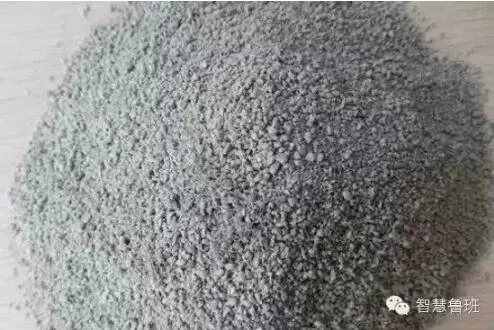
1. Mortar: Ready-mixed inorganic insulation mortar.
2. Water: Tap water.
3. Mixing ratio: Follow the instructions specific to the batch of inorganic insulation mortar.
2. Process Flow
Grassroots treatment → Straightening, squaring, and aligning → Leveling layer → Wall reinforcement (installing standard reinforcement) → Corner protection → Cement window sill plastering → Base mortar plastering → Interface agent spraying → Inorganic insulation mortar plastering → Grid cloth application → Crack-resistant mortar plastering → Curing
3. Operation Method
(1) Mixing Method
Inorganic insulation mortar should be mixed only with clean water; no additives are allowed. The slurry-to-water ratio is approximately 1:1.3 (achieving a mortar consistency of about 70mm), suitable for on-site application. After thorough mixing, let it rest for 5 minutes, stir again, then apply directly to the wall.
(2) Grassroots Treatment
1. As stated, the main structural subprojects must be accepted and signed off by relevant units. Door and window frames, as well as embedded pipelines, must be installed and approved.
2. Erect scaffolding first, maintaining a 200-250mm gap from the wall. Scaffold boards should prevent dust from falling, and ground ash should be collected and reused.
3. Chisel out protruding parts on concrete walls, including honeycombs, rough patches, exposed reinforcement, and loose materials. Fill with 1:2.5 cement mortar in layers, removing exposed steel bar heads and wire leads.
4. Clean dust and oil stains from the surface before construction. Thoroughly water brick walls one day before plastering. For aerated concrete blocks, water two days ahead, ideally twice daily, moistening to a depth of 8-10mm.
5. Reinforce joints between different walls with 150mm metal mesh. Smooth concrete surfaces should be roughened and sprayed with 1-2mm mortar to ensure strong adhesion between the insulation layer and the substrate.
(3) Leveling Layer
If the substrate surface deviates more than 5mm from flatness, a leveling coat must be applied. For this project, a 5mm leveling layer of 1:3 cement mortar will be used. The base plaster layer is applied and smoothed with a grinding board. After the mortar hardens, the insulation layer can be applied.
On the leveling layer, inorganic slurry is used to control the thickness of the plaster or reinforcement. The insulation thickness required by design is 20mm, with reinforcement spacing generally between 1500-2000mm.
(4) Inorganic Insulation Mortar Layer
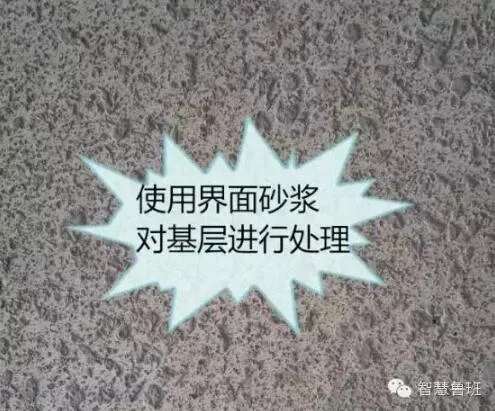
1. Before applying the inorganic insulation mortar, coat the leveling layer with an interface agent or slurry to ensure strong adhesion.
2. Apply the insulation layer in multiple passes, with each layer not exceeding 20mm in thickness. Avoid repeated rubbing. Shape the plaster in two or more batches, allowing each to dry for 24 hours before proceeding. Use a 2-meter wooden straightedge to level the surface. Once dry, apply finish coatings by pressing and polishing directly. For ceramic tile finishes, brushing is required.
3. The application consists of two layers: the first thin layer is applied firmly to ensure bonding with the substrate; the second is applied to design thickness, leveled immediately with a large beam and smoothed with a wooden trowel to create a rough surface texture.
(5) Surface Layer Application (Mesh and Anti-Cracking Mortar)
1. After the insulation layer reaches sufficient strength (about 12 hours in summer, 24-28 hours in other seasons), the covering layer can be applied. The anti-cracking mortar is applied in two layers: the first layer (1-2mm) facilitates bonding with alkali-resistant fiberglass mesh, and the second layer (2-3mm) is leveled and compacted. If the insulation layer dries excessively, evenly moisten the surface before applying.
2. Pay attention to wall flatness during application. Fill any uneven areas with insulation material. Corners, doors, and windows must be square and straight to meet quality standards. Apply the covering layer from top to bottom, maintaining an overall thickness of 3-5mm. Uneven thickness can cause cracking. The covering layer must be tightly pressed, especially at corners, completing one wall at a time to avoid weak interfaces.
3. Prepare cover material and water at a weight ratio of 0.45:1, following product instructions. Add water to the mixing container first, then gypsum-based cover material. Stir repeatedly to a uniform paste. Use the mortar within one hour; discard any material that has hardened or exceeded this time.
4. Within 50 minutes of mixing, level the surface with a large straightedge and texture it roughly. If the surface is relatively flat and rough, add a small amount of water and knead to create a rough texture that improves adhesion with putty.
(6) Maintenance Requirements
When ambient temperature exceeds 25°C, spray water on the insulation layer twice daily for 3 days, starting 36 hours after application.
(7) Precautions for Applying Inorganic Insulation Mortar Layer
Strictly follow the guidelines outlined in this technical disclosure, paying special attention to the following:
1. Store all materials in labeled, categorized areas to avoid misuse. External wall insulation materials and their accompanying cover materials should be kept in a cool, dry place, neatly stacked no higher than 1.5 meters. Avoid exposure to freezing, rain, water, or compression damage.
2. Before applying the insulation layer, check wall flatness. Fill uneven areas with cement mortar; roughen smooth surfaces such as cast-in-place concrete.
3. Apply insulation in two layers: a thin first layer to ensure adhesion, followed by a second layer to design thickness. Immediately level with a large straightedge, then texture the surface with a wooden trowel.
4. Mix external wall insulation and cover materials only with clean water. Use the mixed mortar after 5 minutes and complete plastering within 1-3 hours. Do not reuse hardened materials by adding water. Mix only as needed to avoid waste.
5. The mixing water-to-material ratio should be about 1:1.3 to 1.4; avoid excess water to maintain quality.
6. Do not perform construction during rain, snow, temperatures below 5°C, or winds exceeding level 5. Avoid direct sunlight in summer and take antifreeze precautions in winter.
4. Quality Requirements
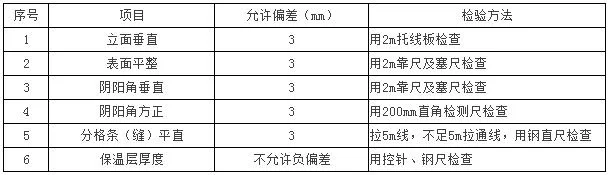
1. The quality of this insulation system must comply with GB50411-2007 “Code for Acceptance of Construction Quality of Building Energy-saving Engineering”. Allowable deviation inspection methods are provided in the table below.
2. Each structural layer must be firmly bonded without delamination, hollowing, or cracking. Foundation treatment should follow standard interior wall plastering methods.
3. Areas requiring treatment, such as holes, cable trays, wire joints, and pipe penetrations through walls, must have precise dimensions, neat edges, and straight, square, clean, and aesthetically pleasing lines.
5. Finished Product Protection
1. Coordinate all types of work closely during construction and arrange processes logically. Reverse process steps are strictly prohibited.
2. Avoid spraying water on walls during construction and drying to protect finish quality.
3. Do not randomly drill holes or soak walls after applying the covering layer.
4. Prevent damage to corners and walls by avoiding heavy impacts when moving objects. Do not lean plastering tools like large bars or shovel handles against walls. Stepping on windowsills is strictly prohibited to avoid edge damage.
5. Promptly clean mortar residue from door and window frames. Aluminum alloy frames must be protected with a film until glass cleaning and finishing.
6. Dismantle scaffolding carefully, stacking materials neatly without damaging doors, windows, or corners.
6. Safety Measures
1. Workers must wear safety helmets when entering the construction site.
2. Operating platforms must be stable. Inspect scaffolding daily before work; only proceed if safe. When using zigzag ladders for height access, only one person may use the ladder at a time. Two workers are prohibited.
3. Keep the work area and surroundings clean and tidy. Ensure clean footwear and site cleanliness after work. Implement strict protective measures for finished products.
4. Employ a certification-based system: personnel in special roles must hold valid operating certificates and are prohibited from working without them.
5. Small and medium-sized machinery must pass inspection and acceptance before use. They must be operated and maintained by qualified personnel. Establish a safety operation system for such machinery and display safety guidelines prominently. Safety devices must be complete, intact, sensitive, and effective.


Must log in before commenting!
Sign Up