
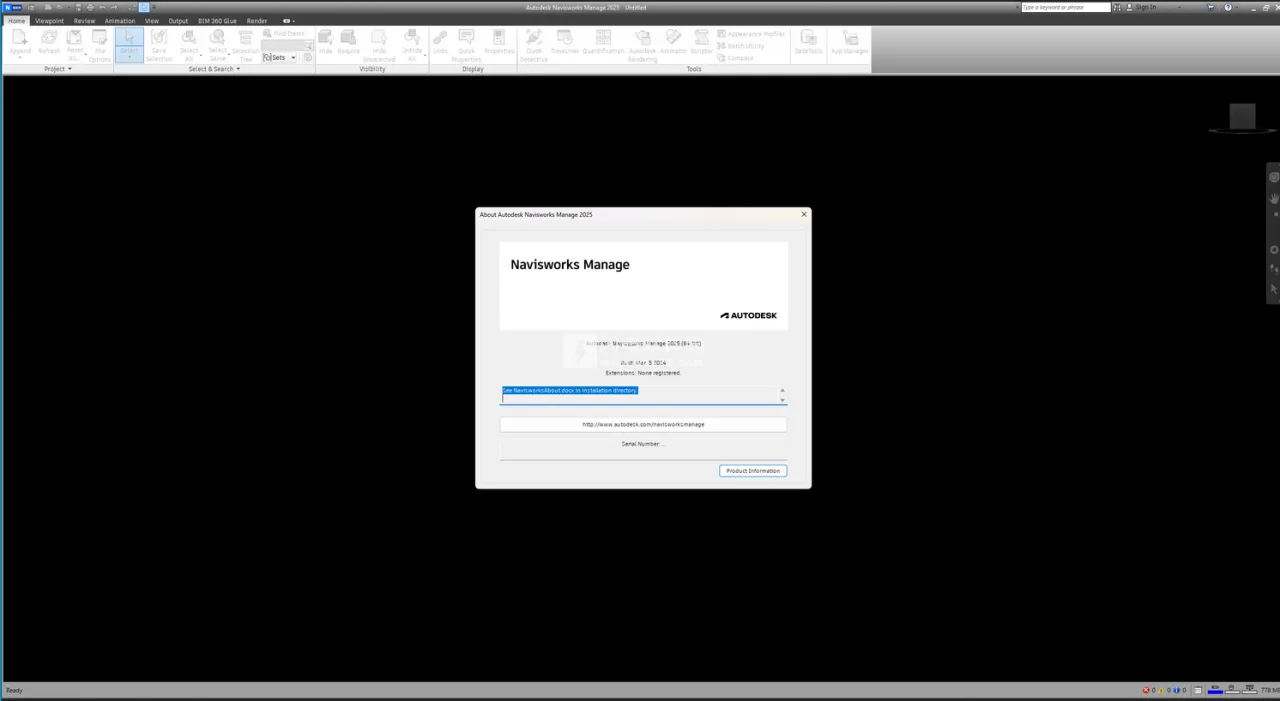
Autodesk Navisworks Manage 2025 and Simulate 2025 are advanced project review tools designed for professionals in Architecture, Engineering, and Construction (AEC). These applications offer powerful features such as design simulation, project review, model visualization, analysis, quantification, and coordination.
The software facilitates real-time project navigation and smooth collaboration among team members. Its model review capabilities support the integration of various model files and data, providing a comprehensive toolkit for thorough project evaluation. Users can easily publish NWD and DWF files and take advantage of built-in collaboration tools.
Model simulation and analysis include 5D progress tracking, photorealistic rendering, and object animation. Quantification tools enable integrated calculations using both models and 2D drawings.
Navisworks Simulate allows users to leverage existing design data to visualize, explore, and interact with 3D projects in real time—long before construction begins. This accessible Building Information Model (BIM) improves efficiency and collaboration among stakeholders, offering valuable insights during and after design and construction phases.
With dynamic navigation and an intuitive project review toolkit, users gain a deeper understanding of projects, even when managing complex 3D models. Navisworks Simulate supports most mainstream 3D design formats and laser scanning files, enabling rapid integration into a shared virtual model. This facilitates detailed reviews of geometry, object information, and linked ODBC databases.
Additional features include conflict detection, gravity simulation, and third-party perspectives to enhance realism. The software quickly generates animations and viewpoints that can be exported as videos or static images. It also offers cross-section views, markup tools, precise measurement functions, and text overlays.
Register your machine by following the included installation package, which contains a complete installation and activation tutorial. Don’t miss out on this powerful solution!
Software Features
1. Complete Your Design Before the Final Deadline
Navisworks Simulate significantly enhances the real-time visualization capabilities of Navisworks Review, streamlining the creation of images, animations, and dynamic linking of 3D models with project schedules. It enables design and architectural professionals to share and integrate design outputs effectively, communicate design intent clearly, validate decisions, and track progress efficiently.
The workflow includes photorealistic renderings of architectural and design concepts alongside 4D construction progress visualizations, allowing comprehensive representation of the project at any stage. Users can quickly import materials, lighting, and environmental data from existing 3D models and incorporate PRC content.
Interactive, realistic renderings and walkthrough animations assist stakeholders in visualizing project outcomes. 4D simulations and object animations facilitate clear communication of design intent, thorough review of alternatives, and enhanced collaboration throughout the design process—minimizing errors, improving quality, and saving time and costs.
By linking 3D model data with project schedules, Navisworks Simulate delivers four-dimensional visualizations that clearly convey design intent, construction plans, and current progress. This comprehensive simulation lets users experience the entire project in advance, develop accurate plans, and reduce uncertainties.
2. Visualization, Navigation, and Experience
Navisworks Simulate enables users to visualize, explore, and interact with 3D projects in real time before construction is complete. Its accessible BIM model enhances efficiency and collaboration among project stakeholders, providing valuable insights during and after the design and construction phases.
Dynamic navigation and an intuitive project review toolkit support a deeper understanding of even complex 3D models. Support for mainstream 3D design and laser scanning formats allows rapid integration into a shared virtual model, facilitating comprehensive reviews of geometry, object data, and linked databases.
Features such as conflict detection, gravity simulation, and third-party perspectives enrich the immersive experience. The software quickly generates animations and viewpoints that can be exported as videos or images. Additional tools include cross-section views, markup options, precise measurement capabilities, and text overlays.
Free Viewing with Autodesk Navisworks Freedom
Autodesk Navisworks Freedom enables free viewing of all simulation content and drawings saved in the NWD format, created with Navisworks Review, Simulate, or Manage. This tool provides a convenient and secure way for design professionals to review project files efficiently.
Navisworks Freedom simplifies viewing large CAD and NWD files without requiring model preparation, third-party servers, training, or extra costs. It also supports viewing 3D DWF files, facilitating effective collaboration through clear communication of design intent, collaborative review, and sharing of analysis results.
Detailed Software Features
- Cross-Section Highlighting: Easily visualize cross-sections and emphasize cutting planes.
- Multithreaded Conflict Detection: Faster and more efficient conflict detection (Navisworks Manage only).
- Updated IFC File Reader: Based on Revit’s open-source code, processes IFC files with hierarchy, Pset operations, and data augmentation.
- Beta DGN File Reader: Adds extra attributes and iModel support.
- BIM 360 Glue Integration: Utilizes shared BIM 360 project data and workflows.
- Integration with AutoCAD, Revit, and ReCap: Open Navisworks files directly within these Autodesk applications.
- Conflict Detection and Coordination: Identify and resolve model issues (Navisworks Manage only).
- BIM 360 Shared Views: Create and share views using Navisworks or BIM 360 Glue.
- Data Integration: Combine design and construction data into a unified model.
- Model Simulation and Animation: Set up animations and interact with models.
- Support for 60+ File Formats: Compatible with numerous third-party applications.
- Team-wide Project Review: Provide consistent access permissions for comprehensive project views.
- Publish and Share: Export models in distributable NWD or DWF formats.
- Enhanced Collaboration: Facilitate clearer communication of design intent and teamwork.
- Measurement Tools: Utilize face, snapshot, axis lock, and quick zoom features for precise measurements.
- Redline Annotation: Add clear, manageable redline markups.
- 5D Project Scheduling: Incorporate time and cost analysis.
- Photorealistic Rendering: Create realistic 3D animations and images.
- Appearance Analyzer: Color project models based on attributes for enhanced clarity.
- Quantitative Data Interaction: Smooth interaction with integrated model data.
- Cloud Rendering: Render entire project models and store or share them via the cloud.
- Real-time Navigation: Browse fully integrated project models.
- Autodesk Rendering Tools: Integrated visualization tools complement other Autodesk products.
- Advanced Point Cloud Integration: Utilize realistic capture functions.
- Quantitative Computations: Supports measurements for both 2D and 3D projects.
- PDF Drawing Quantification: Enables measurements from 2D PDF drawings.
Installation Guide
1. Installation Package
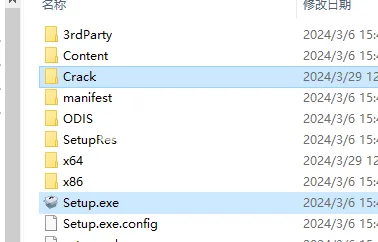
2. Run Setup
Mount the image file and double-click Setup.exe to launch the installer. Follow the on-screen instructions and select the appropriate options as shown below.

3. Select Installation Folder
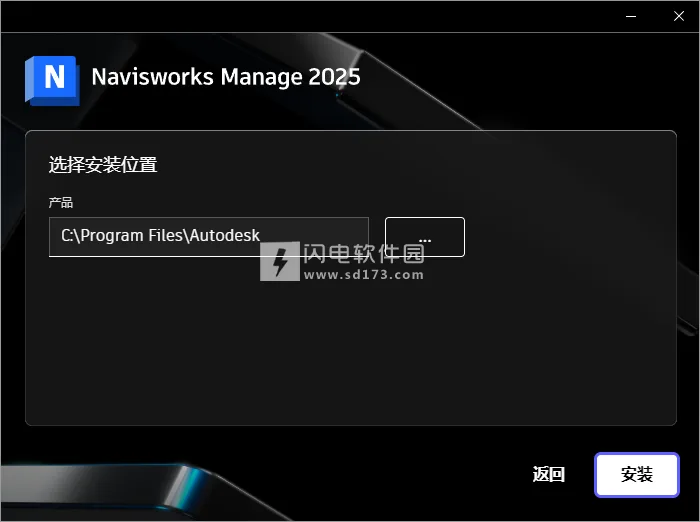
4. Complete Installation
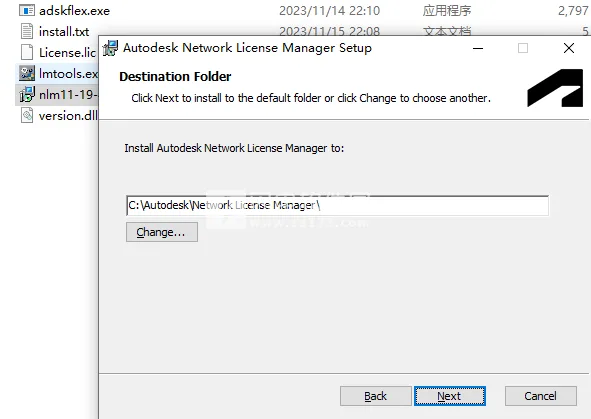
Do not launch the program immediately after installation. Instead, install the Network License Manager (NLM) found in the Medicine folder: nlm11-19-4-1-ipv4-ipv6-win64.MSI. The default installation path is C:AutodeskNetwork License Manager.
If any instances of lmgrd or adskflex are running, please stop them before proceeding.
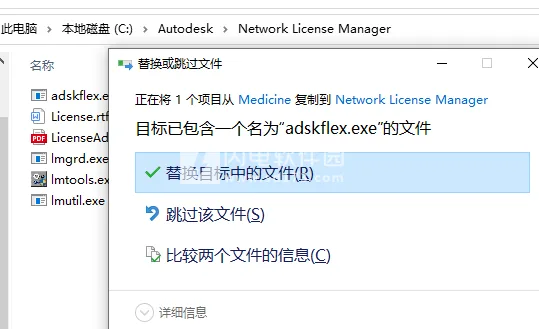
5. Replace the adskflex.exe
Overwrite the original adskflex.exe with the cracked version provided.
6. Replace DLL Files
Replace the necessary DLL files located at C:Program Files (x86)Common FilesAutodesk SharedAdskLicensingCurrentAdskLicenseAgent.

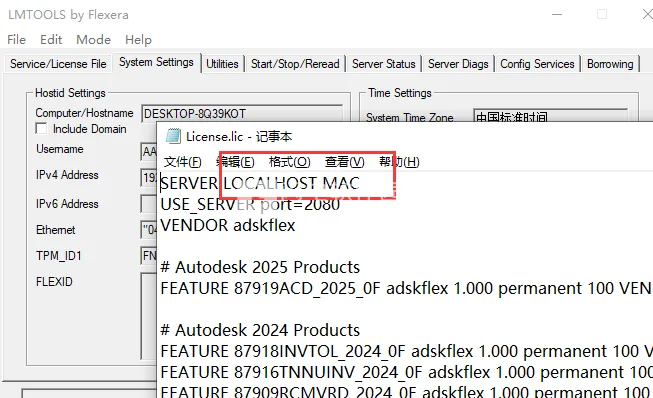
7. Edit lic.dat File
Open the lic.dat file with a text editor and update the HOSTNAME and MAC address to match your system configuration. If unsure, use the LMTOOLS utility’s System Settings tab to find your HOSTNAME and MAC address. Adjust vendor ports or add licenses as needed.
Save the updated lic.dat file to a preferred location, ideally C:AutodeskNetwork License Manager.
8. Start Network License Manager
You have two options for starting the License Manager:
- Manually start the License Manager by running
lmgrd.exe -z -c lic.datinC:AutodeskNetwork License Manager. - Create a service (recommended):
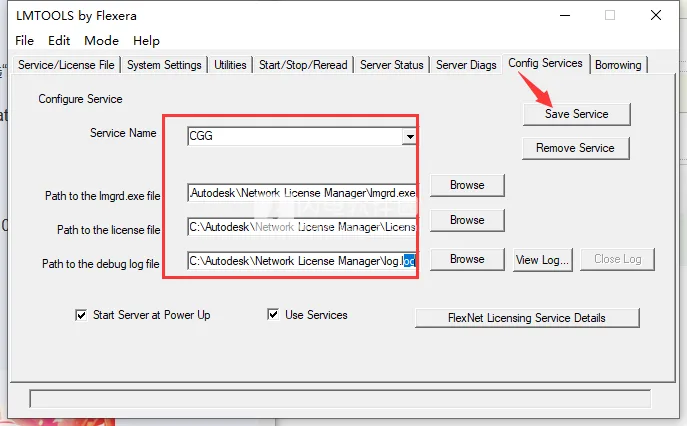
- Open
LMTOOLS.exefrom the Network License Manager folder. - In the Config Services tab, add a new service named “Autodesk.”
- Set the paths for
lmgrd.exe, the license file, and optionally a debug log file. - Enable “Start server at power on” and “Use service.”
- Save the configuration.
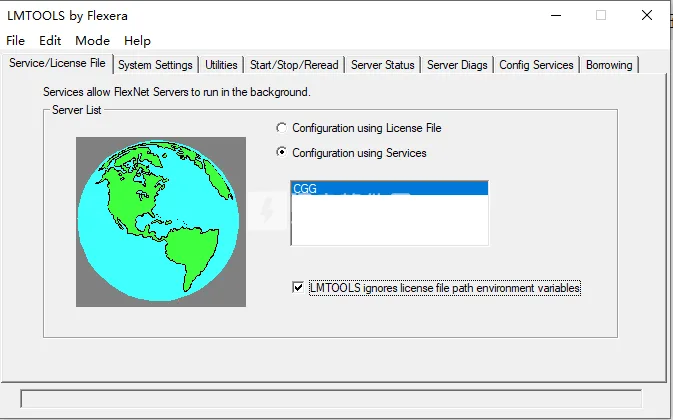
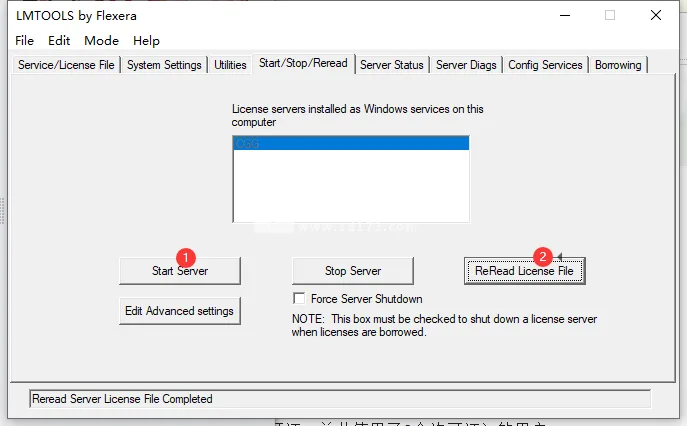
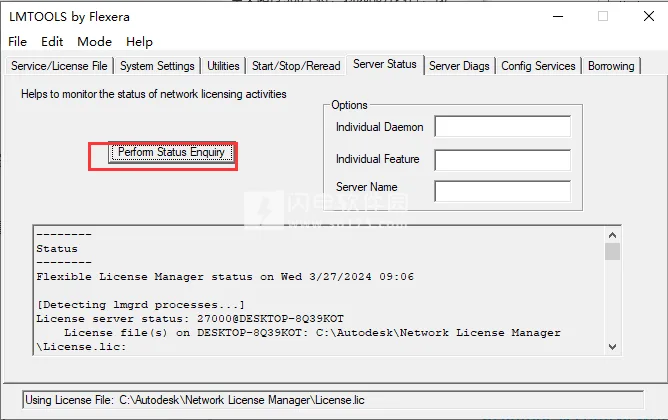
Next, go to the Start/Stop/Reread tab, click Start Server, then Reread License File. Use Server Status to confirm the license server is running properly.
9. Launch Autodesk Application
When prompted, select Use Network License, choose Single License Server, and enter 127.0.0.1, localhost, or the server address of the flexlm daemon (optionally with port syntax: port@server).
Usage Instructions
Control Model Appearance and Rendering Quality
Use the Scene View to manage your model’s real-time appearance and rendering quality. Create real-time visual styles for realistic display or apply Autodesk Rendering for photorealistic images. Both realistic visual styles and interactive ray tracing support smooth real-time navigation.
1. Control Model Appearance
The Rendering Styles panel on the Viewpoints tab lets you adjust your model’s appearance in the Scene View. Note that rendering and lighting modes are disabled in 2D workspaces.
Choose from four interactive lighting modes:
- Full Light
- Scene Light
- Top Light
- No Light
Select one of four rendering modes:
- Full Rendering
- Shade
- Wireframe
- Hidden Line
You can also toggle visibility of five primitive types individually: Surface, Line, Point, Snap Point, and Text.
Note: For textured models, to manually apply color or transparency overrides (using Appearance Configurator or Quantification Appearance), switch from Full Rendering to Shade mode.
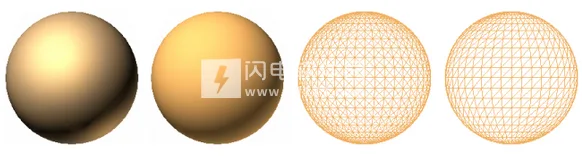
Select Rendering Mode:
Rendering colors geometry by applying preset lighting, materials, and environment settings such as background. Navisworks offers four rendering modes controlling model appearance. The image below shows these modes from left to right: Fully Rendered, Shaded, Wireframe, and Hidden Lines.
Add Lighting:
Select one of four lighting modes to control scene illumination. The image below demonstrates the effects of Full Light, Scene Light, Top Light, and No Light on spheres.

Select Background Effects:
Navisworks offers several background styles for the Scene View:
- Monochrome: Fills the background with a single selected color; default for both 3D and 2D views.
- Gradient: Applies a smooth gradient between two colors, usable in both 3D and 2D views.
- Horizon: Divides the background into sky and ground to simulate a horizon. This applies only to 3D views and is unsupported in 2D or orthographic modes.
Note: The horizon effect is purely visual and does not include a physical ground plane. Navigating below the ground reveals the model and sky colors instead of the ground plane’s backside.
Adjust Graphic Element Visibility:
Enable or disable drawing of surfaces, lines, points, snap points, and 3D text in the Scene View. “Points” represent actual model points, while “Snap Points” mark positions on other elements (e.g., circle centers), useful for measurements.
Control Rendering Quality
1. Use Hidden Object Techniques:
Navisworks optimizes interactive navigation by hiding less significant objects in complex scenes using techniques such as:
- Area: Objects smaller than a pixel threshold are omitted from rendering.
- Backface: By default, only front faces of polygons are rendered. Adjust if front and back faces blend during conversion.
- Near and Far Clipping Planes: Objects too close or too far from the camera may be clipped.
Note: Backface culling and clipping planes do not apply in 2D workspaces.
2. Control Object Rendering During Navigation:
Navisworks dynamically adjusts rendering based on model size, camera distance, and frame rate. Objects that cannot be rendered quickly enough are temporarily skipped to maintain smooth navigation. When navigation pauses, all objects render fully.
Performance depends on hardware (graphics card, drivers), Scene View size, and model complexity. Adequate RAM is essential for loading large models. JetStream technology improves RAM efficiency by paging unused data to disk, enabling navigation before full loading completes.
Tip: Lower frame rates or disable “Ensure frame rate” to reduce the number of ignored objects during navigation.
3. Accelerate Display Performance:
If your graphics card meets minimum requirements, enable hardware acceleration and occlusion culling to improve rendering quality and speed. Some GPUs may require disabling these features if issues arise.
Occlusion culling enhances performance in scenes where most geometry is hidden (e.g., walking through corridors where walls block other elements).
4. Adjust Material Display:
Modify material appearances in the Scene View to optimize graphic performance, especially when navigating models with complex textures.
5. Stereoscopic Rendering:
Navisworks supports stereoscopic 3D visualization with compatible hardware, including active/passive stereo glasses, CRT monitors, and dedicated projectors. This requires a professional OpenGL graphics card supporting quad-buffer stereo.
Note: Stereo mode requires a perspective camera view for correct visualization and may need driver adjustments. Details render progressively with an interactive progress bar.
6. Supported Graphics Systems:
Navisworks 2020 supports two graphics systems: Basic Rendering and Autodesk Rendering (default). Both support real-time navigation. Users can select their preferred system through the Options Editor.
Supported graphics drivers can be viewed in the Options Editor under Interface Display Drivers. By default, all drivers are enabled.


The medicine files are not included in this
Handle Severity(eERROR)component(id(-1),data(0000000000000000),msg(ldentity SDK call 'idsdk_init'failed with result 3005.Autodesk Identity Manager may be missing or corrupt.)How to solve the startup issue after installation?