Today, we will continue exploring Rhino, Revit, and how to integrate Revit with Grasshopper.
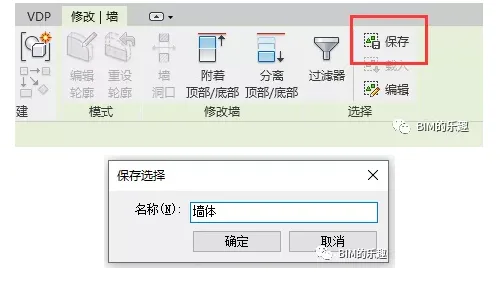
In Revit, you can use filters to select all elements within a specific family category. Similarly, Grasshopper allows you to select elements based on family categories. But can these selections be saved for future use? The answer is yes. In Revit, after filtering a type of element, you can find a save button on the far right of the Modify Context tab that lets you save the current selection set.
However, Revit’s filtering is limited to family categories, whereas Grasshopper offers more precise filtering based on parameters. After filtering, you can directly create a selection set in Grasshopper and reload it in Revit when needed.
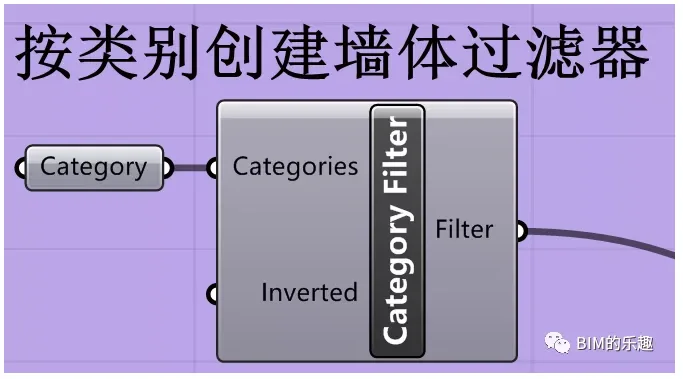
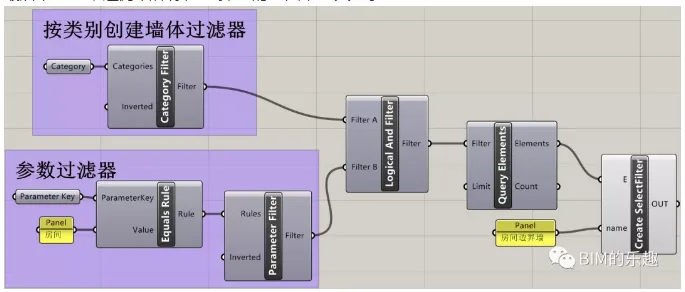
For example, to filter all walls with the annotation parameter “room,” you can first select all walls and then filter them based on that parameter:
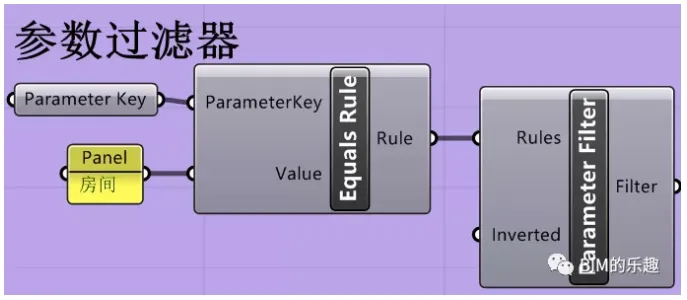
Next, create a parameter filter that targets “comments” with the value “rooms,” then combine the two filters using a “Logical And Filter” node:
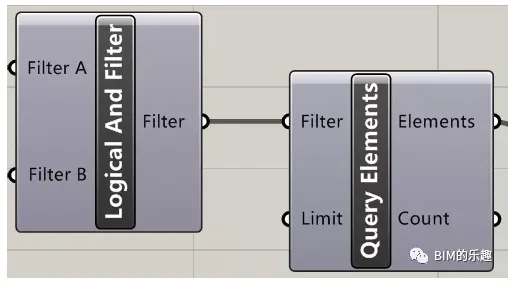
This setup allows us to filter the required walls easily using the “Query Elements” node:
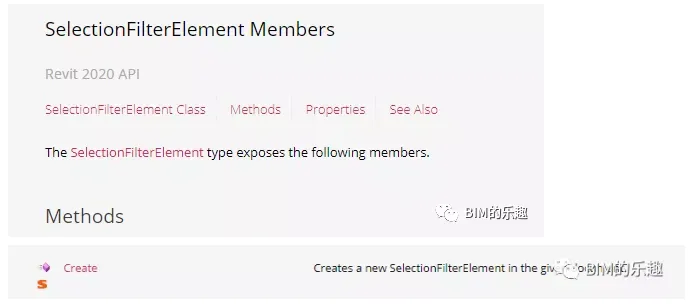
So far, everything works smoothly. However, when it came to creating a selection set, I found no ready-made nodes in the library for this purpose. At this point, I had to consult the API documentation to see if coding could solve the problem.
Opening the Revit API manual and searching for the ionFilterElement method revealed the following:
The creation method is straightforward, and the basic syntax is simple. You can apply it directly:
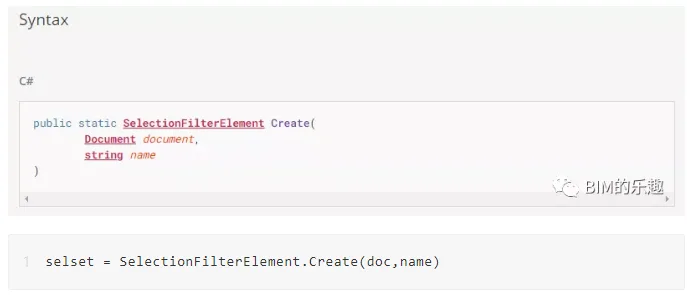
selset = ionFilterElement.(doc, name)
However, during implementation, I found several important considerations:
First, when creating a selection set, you must check if a selection set with the same name already exists in the project because duplications are not allowed. Instead of deleting the existing set, you just clear its selection, then add the new elements.
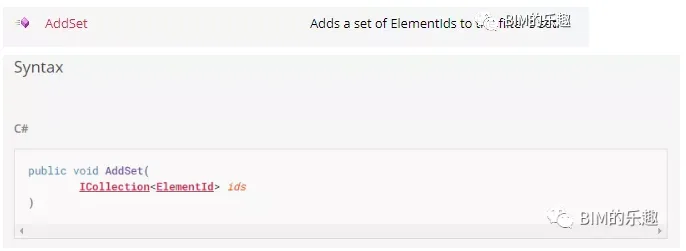
Secondly, the newly created selection set starts empty, so you need to add selected elements to it. This is done using the AddSet method with the following syntax:
Once these two points are clear, writing the code becomes straightforward. Below is the complete code example:
# Copyright(c) 2020, Ninth Brother BIMer
import clr
clr.AddReference(‘System.Core’)
clr.AddReference(‘RhinoInside.Revit’)
clr.AddReference(‘RevitAPI’)
clr.AddReference(‘RevitAPIUI’)
from System import Enum, Action
import rhinoscriptsyntax as rs
import Rhino
import RhinoInside
import Grasshopper
from Grasshopper.Kernel import GH_RuntimeMessageLevel as RML
from RhinoInside.Revit import Revit, Convert
# You can also add extension methods which allow calling on Revit objects ToXXX() Converter Method
clr.ImportExtensions(Convert.Geometry)
from Autodesk.Revit import DB
from Autodesk.Revit.DB import *
# Access the active document object
doc = Revit.ActiveDBDocument
# Filter the elements to be added to the selection set
ids = list()
if not isinstance(E, list):
E = [E]
else:
E = E
for e in E:
ids.append(e.Id)
itemset = set(ids)
# Collect all existing filters from the model
names = list()
collector = FilteredElementCollector(doc)
filters = collector.OfClass(FilterElement).ToElements()
selset = False
t = Transaction(doc, ‘Create Selection Set’)
t.Start()
# If a selection set with that name already exists, clear its contents
for filter in filters:
if filter.Name == name:
filter.Clear()
selset = filter
# Create a new selection set if it does not exist
if selset == False:
selset = ionFilterElement.(doc, name)
# Add the selected elements to the selection set
try:
selset.AddSet(itemset)
OUT = selset.ToDSType(False)
except:
OUT = None
t.Commit()
print(OUT)
Here are the key steps in the code:
- Collect elements to be added and obtain their IDs;
- Retrieve existing selection sets from the model;
- Check if a selection set with the intended name already exists;
- If it exists, clear its current selection;
- If it doesn’t exist, create a new selection set;
- Add the filtered elements to the selection set.
Finally, here is a full screenshot of the selection set used for filtering walls, for your reference:


Must log in before commenting!
Sign Up