BIM Q&A | When to Choose a Work Plane in Revit
In Revit, a work plane is the reference plane on which components are created. It is essential to carefully control the reference plane of elements throughout the modeling process.
For instance, consider a five-story building. If a person is standing on the second floor, their reference plane should be set to the second floor—not the first or third floor. You can then use the elevation offset command to adjust their height precisely to the second floor level. Although it is possible to work without changing the work plane in this scenario, doing so is less standardized and may lead to inconsistencies.
Now, let’s discuss situations where changing the work plane is mandatory. Take the example of a rectangular prism shown below: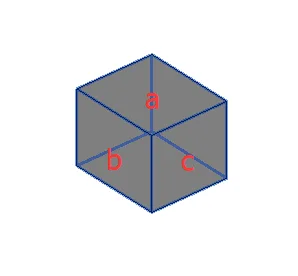
The three faces labeled b and c are perpendicular to each other. Assume the current work plane is face a, meaning faces b and c are perpendicular to the active work plane. In this case, any shape drawn on the work plane will lie on face a. Its projection onto faces b and c will appear only as the boundary lines where these faces meet.
This means that if you try to draw directly on faces b or c while the work plane is set to a, your shapes will collapse into simple lines because those faces are perpendicular to the current plane. Therefore, to accurately draw on faces b or c, you must switch the work plane to each respective face before drawing. Otherwise, anything drawn on those surfaces will be reduced to a line, limiting your ability to create detailed geometry.
This concept can be somewhat complex and requires careful attention to fully grasp. However, mastering when and how to change work planes is crucial for efficient Revit modeling. In summary, you need to update the work plane dynamically during the design process to ensure precise and accurate element placement.


Must log in before commenting!
Sign Up