The technology of external wall insulation systems originated in Germany after World War II. At that time, innovative construction workers devised the idea of using flexible materials to repair buildings damaged during the war, specifically targeting cracked exterior walls. Soon after, polystyrene foam and polyurethane insulation materials were developed, becoming key products for wall repair and insulation. By the 1970s, amid an energy crisis, wall insulation became a mandatory requirement in many European countries.
In the 1980s, this wall insulation technology was introduced to China. After over 30 years of local adaptation, China’s external insulation methods have evolved significantly compared to European standards. However, frequent corner-cutting and insufficient supervision in construction projects have led to recurring issues with insulation quality, drawing widespread attention.
Today, we will revisit authentic foreign construction techniques and methods for external wall insulation.
1. Construction Preparation and Bracket Installation
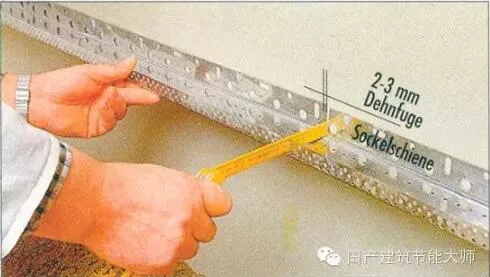
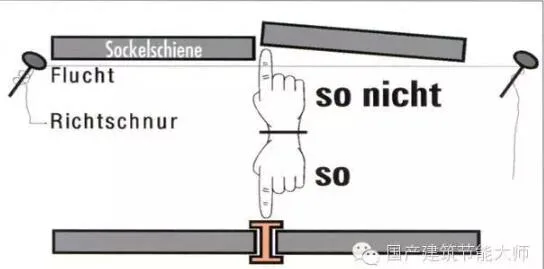
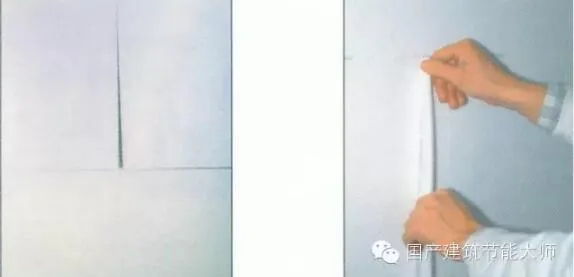
(1) Mark horizontal and vertical control lines on the walls around external doors and windows. Hang vertical reference steel lines at the building’s exterior corners and horizontal lines on each floor to ensure wall verticality and flatness.
(2) Install the brackets accordingly.
2. Preparation of Bonding Mortar for Insulation Boards
Mix the mortar evenly using an electric mixer. Use the mixture within one hour, protecting it from sunlight and wind. Do not add water after mixing time has elapsed; dispose of any leftover mortar as waste. Centralized mixing with dedicated personnel assigned to specific tasks is recommended.
3. Reinforcing the Application of Fiberglass Mesh
All exposed edges of polystyrene boards, such as around windows and expansion joints, should be reinforced by embedding fiberglass mesh.
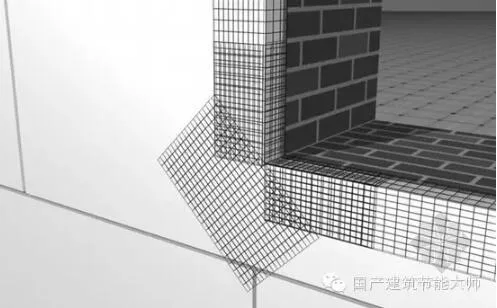
To apply the mesh, first spread polymer mortar onto the wall where the mesh will be placed. Press pre-cut mesh strips horizontally or vertically into the mortar, ensuring at least a 10cm overlap onto the back of the insulation board. The mesh must fully cover the board edges within the primer layer. Avoid mortar on unused mesh areas to prevent issues in subsequent steps. After the mortar sets initially, proceed to the next process.
4. Selecting the Bonding Method for Insulation Boards
If wall flatness is within 5mm per 2 meters, use the strip bonding method. Apply adhesive evenly on one side of the EPS board using a serrated plastering knife, then scrape evenly once more.
If flatness exceeds 5mm per 2 meters, use the point frame method. Apply adhesive along the edges of the board, then distribute six or more adhesive points evenly across the surface. The thickness of these points depends on wall unevenness; rougher surfaces require thicker adhesive points.
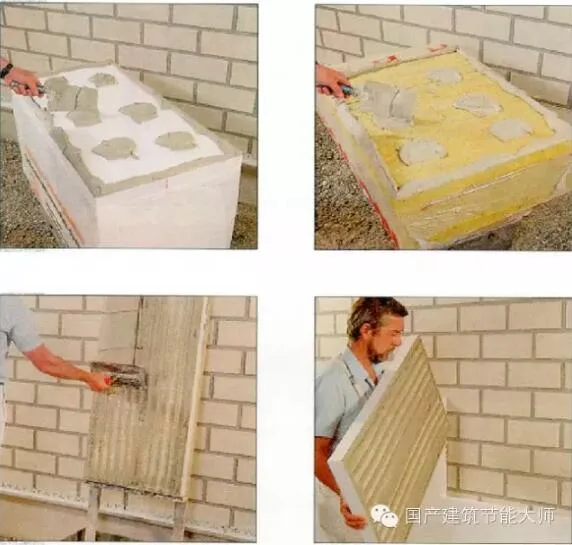
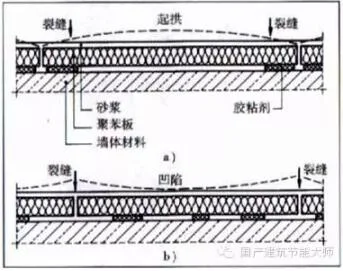
This approach ensures strong bonding between the insulation board and substrate and prevents center protrusions that can cause cracks at board joints. Below are examples of common crack types:
5. Installing the Insulation Board
(1) Before applying polystyrene boards, prepare the wall surface and mark control lines. Hang lines at external and internal corners to ensure flatness during application. Begin layout from wall corners and around doors and windows.
(2) After applying adhesive, press the insulation boards firmly against the wall with gentle, quick pressure, ensuring at least 40% bonding area.
(3) Use a 2-meter straightedge to level the insulation boards, confirming flatness and tight joints.
(4) Boards should be applied horizontally with vertical joints staggered between rows for continuous bonding.
(5) At corners, measure carefully and stagger joints vertically to ensure straight and vertical corners.
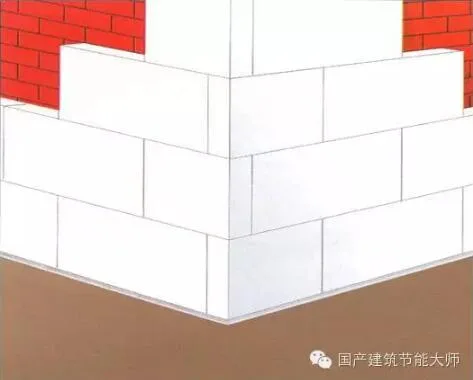
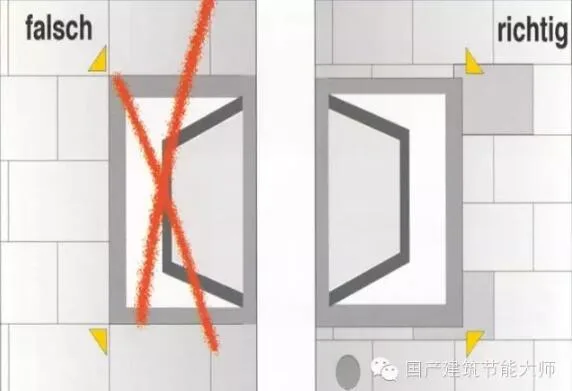
(6) For external corners around window frames and walls, first mark a reference line to control vertical alignment. Cut corner insulation boards as single pieces, avoiding joints at these critical points.
(7) Ensure no bonding mortar is present in the insulation board joints; fill gaps with EPS or spray polyurethane foam.
Note: EPS board surfaces should not remain exposed for long. Apply a protective surface layer promptly after installation.
Prolonged sun exposure causes EPS surfaces to powder and yellow, accelerating aging. If this occurs, sand the surface to remove the aged powder and debris before applying the protective layer.
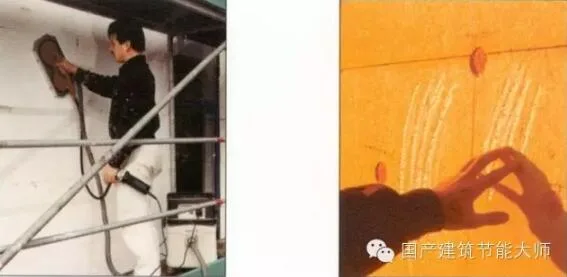
6. Surface Polishing of Insulation Boards
The flatness of EPS board surfaces and the level of joints significantly affect both the appearance and structural integrity of the insulation system. Uneven joints cause stress concentration, leading to cracking when plaster dries and shrinks.
Therefore, when installing EPS boards, ensure flatness via hanging and pulling wires. After one day of adhesive drying, once the mortar has bonded sufficiently, use specialized tools to gently polish uneven surfaces with circular motions. Clean debris with a brush afterward. Avoid relying on protective or decorative layers to level uneven surfaces.
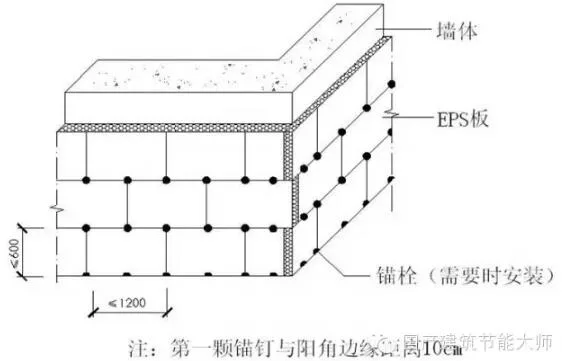
7. Installation of Anchor Bolts
When using paint as the exterior finish, install anchor bolts on EPS boards 24 hours after adhesive curing.
Installing anchor bolts while the plaster mortar is still uncured is easier, and fiberglass mesh remains wrinkle-free. If installed late, minor cracks around the anchor plate should be promptly repaired with mortar and reinforced with mesh.
The plastic disc of the anchor bolt should not protrude from the board surface; its concave area must be smoothed with plaster mortar.
Anchor bolts must penetrate at least 25mm into the wall; the plaster layer itself does not count as effective anchoring depth. Select appropriate anchor bolts based on wall material and adjust penetration depth to ensure sufficient anchoring force.
Drill holes should be 1cm deeper than the anchor bolt length, with drill bit diameter matching the anchor sleeve size to ensure proper installation without damaging anchoring strength.
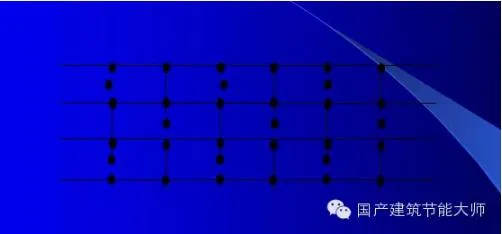
Anchor bolts are typically placed at intersections of insulation board joints to guarantee adhesive presence. If additional bolts are needed, place them centrally on the boards. Below is a diagram illustrating anchor bolt distribution:
For loose walls such as porous bricks or aerated blocks, avoid electric hammers. Use low-impact drills and minimize impact force, relying on rotation rather than hammering to prevent wall damage and ensure anchor bolt effectiveness. Use specialized anchors where appropriate.
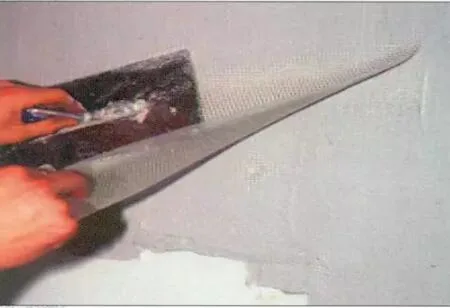
8. Applying Fiberglass Mesh and Polymer Mortar Cover
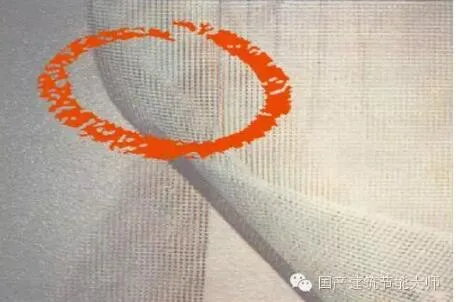
(1) At least 24 hours after installing insulation boards, apply a 2mm thick base layer of mortar on the board surface. Immediately embed alkali-resistant fiberglass mesh into the mortar, pressing it flat from center to edges using a trowel. Avoid wrinkles and do not press mesh too deeply; it should remain just beneath the mortar surface.
(2) Mesh overlaps must be at least 100mm flat, 200mm on external corners, and 100mm on internal corners. The protective cement-based surface layer should be about 3mm thick, not exceeding 6mm.
Layers that are too thin or thick are prone to cracking. Thin layers compromise impact resistance, while insufficient adhesive quantity leads to poor bonding. Ensure continuous construction between layers to avoid interface issues. Thin layers dry rapidly, losing strength.
Notes:
- Fully cover the base mortar layer.
- Embed two layers of fiberglass mesh within the mortar.
- Apply an additional mortar layer on top, totaling 3-6mm thickness.
- Overlap fiberglass mesh by about 10cm.
- Always embed mesh into fresh mortar immediately. After smoothing, mesh should not be visible.
- Avoid placing fiberglass mesh before plastering mortar; this can create an isolation layer between mesh and EPS, reducing system safety and stress dispersion.
(4) Single mesh lengths should not exceed 6 meters. Overlaps during installation must meet horizontal 100mm and vertical 80mm minimums.
(5) Once the polymer mortar surface dries, apply an additional 1-2mm mortar layer to slightly cover mesh outlines. Avoid overworking the surface to prevent hollows.
(6) At corners, maintain mesh continuity by wrapping it in both directions. Minimum mesh width is 200mm on external corners and 100mm on internal corners.
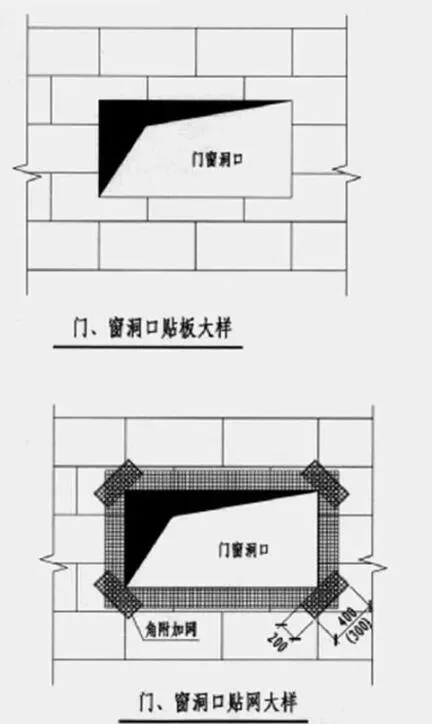
(7) Around doors and windows, reinforce mesh diagonally at the four corners with 400×200mm patches. Add standard mesh strips of equal width and length of 100mm on inner corners to prevent cracking.
(8) The total thickness of the polymer mortar covering should be 3-6mm. After completion, allow at least 24 hours before proceeding.
(9) Add another standard mesh layer to exterior walls on the first and second floors for local reinforcement. The total polymer mortar thickness should be 5-7mm. Note that cracks may still occur.
9. Quality Requirements for Plaster Mortar Surface
Allowable deviation inspection methods:
- Vertical facade: inspect with a 2-meter wire support board.
- Smooth surface: check with a 2-meter ruler and feeler gauge.
- Vertical internal and external corners: inspect with 2-meter wire support board.
- Verify square shapes of internal and external corners using feeler gauges.
- Check straightness of grid joints using a 5-meter small line and ruler.
10. Decorative Material Application
- Use elastic putty for the base layer.
- Choose coatings with good breathability and high elasticity.
- Avoid flat paints whenever possible.
- Apply decorative coatings following relevant standards and regulations.


Must log in before commenting!
Sign Up