Installation Instructions
Scene Assistant versions 4.1 and 3.0 can coexist and be used simultaneously.
Compatibility:
Scene Assistant 4.1 supports 3ds Max 9 and later versions (both 32-bit and 64-bit).
Scene Assistant 4.0 supports 3ds Max 8 and earlier versions.
Scene Assistant Installation Guide:
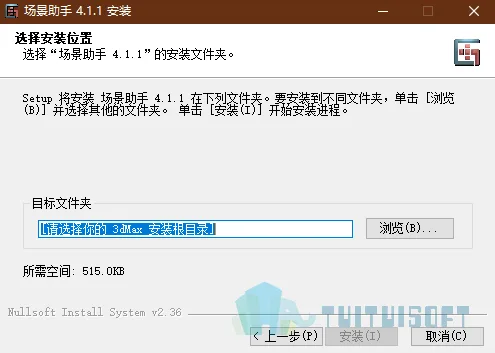
1. Download and unzip the package. Double-click Scene Assistant 4.1.1.exe to start the installation, then click “Next”.

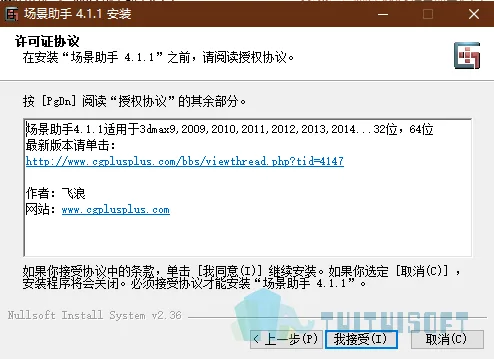
2. Read the License Agreement carefully and click “I Accept” to proceed.
3. Click the “Browse” button to locate your 3ds Max installation directory. This step is mandatory; otherwise, the “Install” button will remain disabled.
After selecting the directory, click “Install”. Wait for the installation to complete, then click “Finish”.
Scene Assistant 4.1.1 Features
1. Object Count: Displays total objects, selected objects, and objects without assigned materials.
2. Scene Information: Shows overall scene details.
3. Material Count: Includes total materials, materials with duplicate names, and materials missing textures.
4. Total Objects: Counts all object types; objects without materials include only geometry and renderable lines.
5. Selected Object Faces: Calculates the total faces of selected objects, including renderable lines.
6. Total Scene Faces: Calculates faces of all objects in the scene, including renderable lines.
7. Face Count Control: Option to enable or disable calculating selected object faces.
8. Scene Count Control: Option to enable or disable calculating total scenes.
9. Refresh: Recalculates all values on click; calculation duration is displayed in the script box at the bottom left (e.g., “Refresh took 0.0 seconds”).
10. Multi/Sub-Object Material Calculation: If enabled, counts sub-materials separately; otherwise, counts Multi/Sub-Object as a single material.
11. Select Objects Without Materials: Selects objects lacking assigned materials.
12. Scene Organization: Provides centralized control of objects and materials.
13. Wireframe Color Modification by Material: Randomly changes wireframe colors based on materials.
14. Collapse by Material: Merges objects by material name; fixes issue with 1.0 normal.
15. Clear Materials: Resets materials in the editor to default settings. If VRayMtl is selected, defaults to VRayMtl; otherwise, defaults to Standard. If the current renderer is not VRay, clears to Standard by default. Modified colors are preserved during clearing. Material import starts from the first screen each time.
16. Choose Collapse by Material: Works as described in Collapse by Material.
17. Import and Select Object Materials: Imports materials with the same names and missing textures.
18. Import Materials: Imports all scene materials in name order. If editor material slots are full, subsequent clicks import materials from the next batch until all are imported, then cycles back.
19. View Lost Maps: Opens dialog to view missing textures and web files.
20. Clear Selected Textures: Removes textures using the selected texture path.
21. Select Object by Texture: Selects objects using a specific texture; double-clicking in the list achieves the same.
22. Refresh: Recalculates missing textures and optical meshes.
23. Find Texture: Toggles the Find Texture dialog box.
24. Find Texture Dialog Options: Includes all subdirectories if checked, enabling recursive search for textures.
25. Default Texture Path: Saves paths for quick access next time.
26. Convert All Materials to Color: Assigns random complementary colors to all materials. Even-numbered materials get colors complementary to odd-numbered ones, which may cause some materials to have similar hues consecutively.
27. One-Click Material Assignment: Assigns materials to objects whose names start with a material name from the currently open external material library.
28. Merge Materials with Same Name: Merges duplicate materials by name.
29. Import Material Library Material: Imports materials from the open material library into the editor.
30. Pick Material: Picks a material from the library and assigns it to the active material slot.
31. Rename: Offers two renaming methods for objects or materials: renaming all at once or adding prefixes. Material renaming records the last sequence number for continuous numbering.
32. Material Conversion: Converts between Standard materials and VRayMtl, affecting diffuse color, diffuse map, bump, opacity, and displacement. Composite materials support only Multi/Sub-Object conversion.
33. Scene-wide VRayMtl Modification: Controls VRayMtl materials globally, with options to affect all materials or only those in the material editor. Supported composite materials include Blend, Composite, Double-Sided, Multi/Sub-Object, Shell Material, TopBottom, VRay2SidedMtl, VRayBlendMtl, VRayMtlWrapper, and VRayOverrideMtl.
34. Random Operations: Applies random modifications to scene objects or individual editable polys. Useful for tasks like randomizing tree placement or material IDs.
35. Random Selection:
- If no objects are selected, selects objects based on a specified percentage of visible objects in the scene.
- If multiple objects are selected, selects based on a percentage of those selected.
- If an editable poly is selected, selection is based on specified sub-object levels (vertices, edges, faces) within Editable Poly mode.
- Right-clicking allows random selection of sub-levels under Editable Poly.
- Selects all unclosed edges at the third level of Editable Poly.
36. Refresh: Recounts objects, vertices, edges, and faces with each refresh. Automatically refreshes after starting random selection.
37. Scaling: Randomly scales selected objects within specified minimum and maximum size percentages relative to their original size. It is recommended to use ‘Axis Centering’ first. Right-click resets scale to original.
38. Rotation: Randomly rotates selected objects around the Z-axis within specified angle ranges. Right-click resets rotation.
39. Axis Centering: Centers the pivot axis of selected objects, equivalent to Pivot > Affect Pivot Only > Center to Object in the Hierarchy panel. Prioritizes grouped objects.
40. Axis Centering (Bottom Center): Centers the pivot axis to the bottom center position, prioritizing grouped objects.
41. Return to Coordinate Center: Moves the object to the pivot axis position, equivalent to Pivot > Affect Object Only > Center to Pivot in the Hierarchy panel. Prioritizes grouped objects.
42. Zero Point at Lowest Position: Moves selected objects so their lowest point aligns with the X and Y axes horizontal plane. Prioritizes grouped objects.
43. Group Priority for Axis Operations: If enabled, axis operations apply only to the outermost group of selected objects; otherwise, they affect all sub-objects.
44. Special Functions: Features designed for critical moments in workflow.
45. Memory Release: Clears scene textures and undo history to free memory. Recommended before rendering or saving when working with large scenes to prevent crashes.
46. Select Objects Without UV: Selects objects lacking UV coordinates that may cause rendering errors. This excludes default geometry with UVs.
47. Select Objects Not Visible in Current Active View: Selects objects entirely outside the current viewport. Objects partially visible are excluded. To select sub-objects of grouped objects, open the group first.
48. Select Objects Not Visible to Animation Camera: After selecting a camera, this command analyzes each frame on the timeline and selects objects never visible during the entire camera animation. For single-frame cameras, use the previous visibility selection function.
49. One-Click Rendering: Designed for convenience (Note: Removed in version 2.0 Final). Located at the bottom of the rendering panel, left of the Render button, under “Preset: ———“. Save and load rendering presets (*.rps) to quickly apply frequently used settings. Clicking the teapot icon loads the preset and starts rendering. “Import Presets” imports settings without rendering. Once opened, paths are remembered automatically.
50. Use Preset Resolution: Applies saved resolution settings from rendering presets.


Must log in before commenting!
Sign Up