The Revit API provides a method called Document.ExportImage() that allows you to export one or multiple views as image files. This method requires an ImageExportOptions object, which lets you customize settings such as which views to export, file paths, image sizes, and more.
Exporting a Single View
using Autodesk.Revit.Attributes;
using Autodesk.Revit.DB;
using Autodesk.Revit.UI;

namespace ScreenShot
{
 [Transaction(TransactionMode.Manual)]
 public class Command : IExternalCommand
 {
  public Result Execute(ExternalCommandData commandData, ref string message, ElementSet elements)
  {
   ImageExportOptions options = new ImageExportOptions();
   options.ZoomType = ZoomFitType.FitToPage;
   options.ExportRange = ExportRange.CurrentView;
   options.FilePath = @"C:UsersAdministratorDesktopCurrentViewImg";
   options.FitDirection = FitDirectionType.Horizontal;
   options.HLRandWFViewsFileType = ImageFileType.JPEGMedium;
   options.ShadowViewsFileType = ImageFileType.JPEGMedium;
   options.PixelSize = 1920;

   commandData.Application.ActiveUIDocument.Document.ExportImage(options);

   return Result.Succeeded;
  }
 }
}
The code above exports the current view as a JPEG image saved to the desktop. If you want to capture only the visible portion of the current window (a screenshot), set options.ExportRange to VisibleRegionOfCurrentView instead.
Exporting Multiple Views
using Autodesk.Revit.Attributes;
using Autodesk.Revit.DB;
using Autodesk.Revit.UI;
using System.Collections.Generic;

namespace ScreenShot
{
 [Transaction(TransactionMode.Manual)]
 public class Command : IExternalCommand
 {
  public Result Execute(ExternalCommandData commandData, ref string message, ElementSet elements)
  {
   Document doc = commandData.Application.ActiveUIDocument.Document;
   FilteredElementCollector views = new FilteredElementCollector(doc).OfClass(typeof(View));
   views.OfCategory(BuiltInCategory.OST_Views);

   IList<ElementId> ImageExportList = new List<ElementId>();
   foreach (View view in views)
   {
    if (view.IsTemplate) continue;
    ImageExportList.Add(view.Id);
   }

   var options = new ImageExportOptions
   {
    ZoomType = ZoomFitType.FitToPage,
    PixelSize = 1920,
    FilePath = @"C:UsersAdministratorDesktopViews",
    FitDirection = FitDirectionType.Horizontal,
    HLRandWFViewsFileType = ImageFileType.JPEGMedium,
    ShadowViewsFileType = ImageFileType.JPEGMedium,
    ImageResolution = ImageResolution.DPI_300,
    ExportRange = ExportRange.SetOfViews
   };

   options.SetViewsAndSheets(ImageExportList);
   doc.ExportImage(options);

   return Result.Succeeded;
  }
 }
}
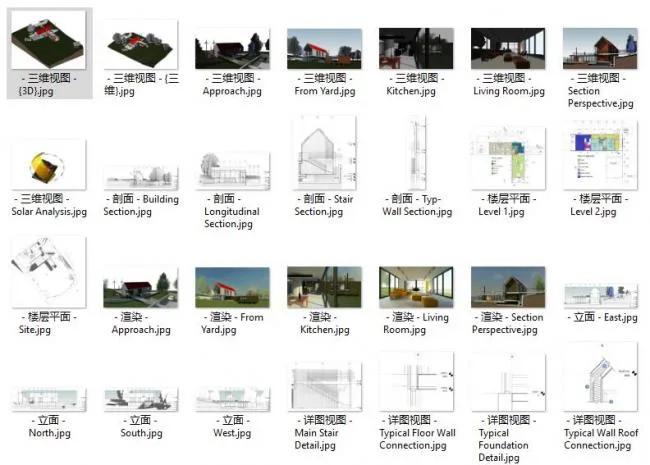
This example exports all non-template views in the project as JPEG images into a folder named “Views” on the desktop.
Below is an example image showing the exported views:
Please feel free to suggest any corrections or improvements. Thank you!


Must log in before commenting!
Sign Up