Creating a Simple Revit External Command Program (Revit 2017 + VS 2015)
- Open Visual Studio (VS2015 in this example). Click New Project → Visual C# → Class Library. Enter a project name, for example, Hello World.
- Go to Project → Add Reference → Browse. Locate and add
RevitAPI.dllandRevitAPIUI.dllfrom your Revit installation folder. - In Solution Explorer, right-click on both RevitAPI and RevitAPIUI references, select Properties, and set Copy Local to
False. This prevents copying many referenced files to the output folder. - Optionally, rename the default class
Class1in Solution Explorer to a preferred name. - Replace the class code with the following:
using Autodesk.Revit;
using Autodesk.Revit.DB;
using Autodesk.Revit.UI;
using Autodesk.Revit.Attributes;
namespace Hello_World
{
[Transaction(TransactionMode.Manual)]
public class Command : IExternalCommand
{
public Result Execute(ExternalCommandData commandData, ref string message, ElementSet elements)
{
try
{
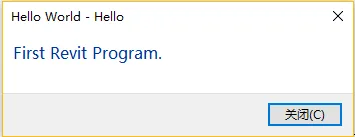
TaskDialog.Show("Hello", "First Revit Program.");
}
catch (Exception e)
{
message = e.Message;
return Result.Failed;
}
return Result.Succeeded;
}
}
}
- Go to Project → Properties → Debugging. Under Start External Program, browse to your Revit installation directory and select
Revit.exe. For example:D:Revit2017Revit 2017Revit.exe. Save the settings. - Build the project. The compiled DLL file (e.g.,
Hello World.dll) will be generated in the Debug folder. - To add your external command to Revit, navigate to the folder:
C:UsersAdministratorAppDataRoamingAutodeskRevitAddins2017(For Windows 10; similar path for Windows 7).
Create a new text file namedHello World.addinwith the following content:
<?xml version="1.0" encoding="utf-8"?>
<RevitAddIns>
  <AddIn Type="Command">
    <VendorId>ACID</VendorId>
    <Text>Hello Revit</Text>
    <Description>Hello World to Revit.</Description>
    <FullClassName>Hello_World.Command</FullClassName>
    <Assembly>F:MyTestDemosHello WorldHello WorldbinDebugHello World.dll</Assembly>
    <AddInId>E2CB270D-2889-48AD-8193-C93663BE7AD9</AddInId>
  </AddIn>
</RevitAddIns>
- VendorId: Developer ID, can be any name you choose.
- Text: The plugin name as it will appear in Revit.
- Description: Optional description of the plugin.
- FullClassName: The full namespace and class name of your command.
- Assembly: The full path to the compiled DLL.
- AddInId: A unique ID, which you can generate in Visual Studio via Tools → Create GUID.
After completing these steps, open Revit. Navigate to Add-Ins → External Tools and you should see your Hello World plugin listed.


xuebim
Follow the latest BIM developments in the architecture industry, explore innovative building technologies, and discover cutting-edge industry insights.
← Scan with WeChat


Must log in before commenting!
Sign Up