The Quick Access toolbar in Revit features familiar icons on the far left, such as Open and Save. But do you know what functionalities lie behind these icons? Let’s explore them together!
Here is an overview of the main Quick Access toolbar functions:
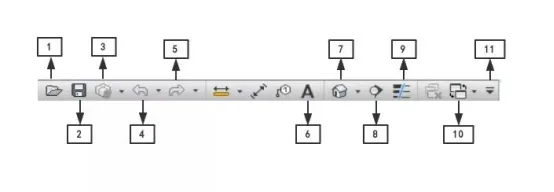
1. Open: Open a project, family, annotation, building component, or IFC file.
2. Save: Save the current project, family, annotation, or template file.
3. Synchronize and Modify Settings: Synchronize local files with those on the central server.
4. Undo: Cancel the last operation and view a list of all actions performed during the current task.
5. Redo: Restore the last undone operation and display all recovered actions during the task.
6. Text: Add annotations to the current view.
7. 3D View: Open or create views such as the default 3D view, camera view, and walkthrough view.
8. Section: Create section views.
9. Fine Lines: Display all lines with a uniform width on the screen, regardless of zoom level.
10. Switch Window: Click the drop-down arrow to select and switch between different views.
11. Customize Quick Access Toolbar: Customize which items appear on the Quick Access toolbar.
Additionally, you can personalize the toolbar by adding or rearranging tools to suit your workflow.
For example, to add the Wall tool to the Quick Access toolbar, right-click the “Wall” tool in the ribbon and select “Add to Quick Access Toolbar”. This will add the Wall tool and its related functions simultaneously. Similarly, right-click any tool on the Quick Access toolbar and choose “Remove from Quick Access Toolbar” to remove it.
After reviewing these features, do you feel confident mastering all the functions of the Quick Access toolbar?


Must log in before commenting!
Sign Up