The official tutorial code for Revit secondary development is suitable for practice and functional testing, but it does not meet the standards required in professional development environments. Here, you can use this simple standard template, which is primarily based on Revit’s SDK sample cases and my own development experience within a company. The logic is straightforward: the main program class instantiates the window, a class stores temporary data, and then the main window handles the UI.
Let’s start by examining the WinForms implementation:
1. Main Program Class
using System;
using System.Collections.Generic;
using System.Text;
using System.Windows.Forms;

using Autodesk.Revit;
using Autodesk.Revit.DB;
using Autodesk.Revit.UI;
using Autodesk.Revit.DB.Structure;

namespace RevitTest
{
 /// <summary>
 /// Implements the Revit add-in interface IExternalCommand
 /// </summary>
 [Autodesk.Revit.Attributes.Transaction(Autodesk.Revit.Attributes.TransactionMode.Manual)]
 [Autodesk.Revit.Attributes.Journaling(Autodesk.Revit.Attributes.JournalingMode.NoCommandData)]
 public class Command : IExternalCommand
 {
  public Result Execute(ExternalCommandData commandData, ref string message, ElementSet elements)
  {
   try
   {
    // Prepare data
    TempData tempData = new TempData(commandData);

    // Show UI
    using (ElementIdForm displayForm = new ElementIdForm(tempData))
    {
     DialogResult result = displayForm.ShowDialog();
     if (DialogResult.OK != result)
     {
      return Autodesk.Revit.UI.Result.Cancelled;
     }
    }

    return Autodesk.Revit.UI.Result.Succeeded;
   }
   catch (Exception e)
   {
    message = e.Message;
    return Autodesk.Revit.UI.Result.Failed;
   }
  }
 }
}
2. Temporary Data Class
using System;
using System.Collections;
using System.Collections.Generic;
using System.Text;

using Autodesk.Revit.DB;
using Autodesk.Revit.UI;
using Autodesk.Revit;
using Autodesk.Revit.UI.Selection;

namespace RevitTest
{
 public class TempData
 {
  private UIDocument m_revitDoc;
  private Document m_Doc;
  private ElementId m_elemId;

  public ElementId ElemId
  {
   get { return m_elemId; }
   set { m_elemId = value; }
  }

  public TempData(ExternalCommandData commandData)
  {
   m_revitDoc = commandData.Application.ActiveUIDocument;
   m_Doc = commandData.Application.ActiveUIDocument.Document;
   Reference reference = m_revitDoc.Selection.PickObject(ObjectType.Element);
   m_elemId = m_Doc.GetElement(reference).Id;
  }
 }
}
3. Main Window Class
using System;
using System.Collections.Generic;
using System.ComponentModel;
using System.Data;
using System.Drawing;
using System.Linq;
using System.Text;
using System.Threading.Tasks;
using System.Windows.Forms;
namespace RevitTest
{
public partial class ElementIdForm : Form
{
private TempData m_tempData;
public ElementIdForm(TempData tempData)
{
InitializeComponent();
m_tempData = tempData;
textBox1.Text = m_tempData.ElemId.ToString();
}
}
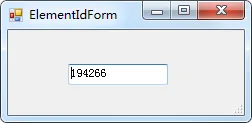
}This implementation allows you to select an element and directly display its ID.
Next, let’s look at a simple WPF window template.
Main Program Code:
using System;
using System.Collections.Generic;
using System.Text;

using Autodesk.Revit;
using Autodesk.Revit.DB;
using Autodesk.Revit.UI;
using Autodesk.Revit.DB.Structure;

namespace WpfTest
{
 /// <summary>
 /// Implements the Revit add-in interface IExternalCommand
 /// </summary>
 [Autodesk.Revit.Attributes.Transaction(Autodesk.Revit.Attributes.TransactionMode.Manual)]
 [Autodesk.Revit.Attributes.Journaling(Autodesk.Revit.Attributes.JournalingMode.NoCommandData)]
 public class Command : IExternalCommand
 {
  public Result Execute(ExternalCommandData commandData, ref string message, ElementSet elements)
  {
   try
   {
    // Prepare data
    TempData tempData = new TempData(commandData);

    // Show UI
    ElementIdWindow EIwindow = new ElementIdWindow(tempData);
    if (EIwindow.ShowDialog() == true)
    {
     // Do something if needed
    }
   }
   catch (Exception e)
   {
    message = e.Message;
    return Autodesk.Revit.UI.Result.Failed;
   }
   return Autodesk.Revit.UI.Result.Succeeded;
  }
 }
}
Temporary Data Class:
using System;
using System.Collections;
using System.Collections.Generic;
using System.Text;

using Autodesk.Revit.DB;
using Autodesk.Revit.UI;
using Autodesk.Revit;
using Autodesk.Revit.UI.Selection;

namespace WpfTest
{
 public class TempData
 {
  private UIDocument m_revitDoc;
  private Document m_Doc;
  private string m_elemId;

  public string ElemId
  {
   get { return m_elemId; }
   set { m_elemId = value; }
  }

  public TempData(ExternalCommandData commandData)
  {
   m_revitDoc = commandData.Application.ActiveUIDocument;
   m_Doc = commandData.Application.ActiveUIDocument.Document;
   Reference reference = m_revitDoc.Selection.PickObject(ObjectType.Element);
   m_elemId = m_Doc.GetElement(reference).Id.ToString();
  }
 }
}
Main Window Code:
using System;
using System.Collections.Generic;
using System.Linq;
using System.Text;
using System.Threading.Tasks;
using System.Windows;
using System.Windows.Controls;
using System.Windows.Data;
using System.Windows.Documents;
using System.Windows.Input;
using System.Windows.Media;
using System.Windows.Media.Imaging;
using System.Windows.Navigation;
using System.Windows.Shapes;

namespace WpfTest
{
 /// <summary>
 /// Interaction logic for ElementIdWindow.xaml
 /// </summary>
 public partial class ElementIdWindow : Window
 {
  public ElementIdWindow(TempData tempData)
  {
   InitializeComponent();
   DataContext = tempData;
  }

  private void btnOK_Click(object sender, RoutedEventArgs e)
  {
   this.DialogResult = true;
  }
 }
}
XAML Code:
<Window x:Class="WpfTest.ElementIdWindow"
 xmlns="http://schemas.microsoft.com/winfx/2006/xaml/presentation"
 xmlns:x="http://schemas.microsoft.com/winfx/2006/xaml"
 xmlns:mc="http://schemas.openxmlformats.org/markup-compatibility/2006"
 xmlns:d="http://schemas.microsoft.com/expression/blend/2008"
 xmlns:local="clr-namespace:WpfTest"
 mc:Ignorable="d" Height="150" Width="200"
 d:DesignHeight="300" d:DesignWidth="300">

 <Grid>
  <StackPanel>
   <TextBox Margin="10" Text="{Binding Path=ElemId}"></TextBox>
   <Button Margin="10" Click="btnOK_Click">OK</Button>
  </StackPanel>
 </Grid>
</Window>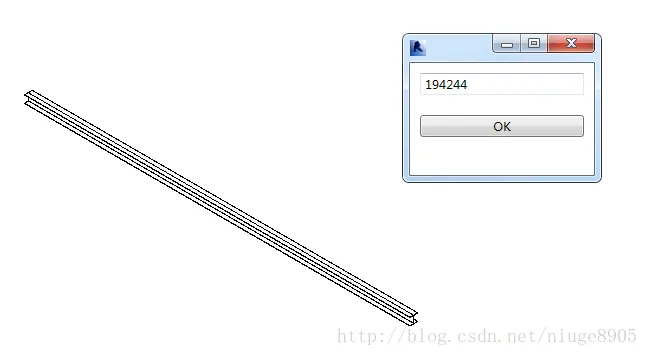
In summary, WPF is a powerful option, especially due to its robust data binding capabilities.


Must log in before commenting!
Sign Up